End User Guide
This section describes the features and functions that are specific to the Amazon Connect app for Zendesk. The user should refer to the Amazon Connect User Guide (page 321 and onwards) for detailed information on use of the Amazon Connect softphone.
The first time after the Amazon Connect app is installed and you log in to your Zendesk instance you will need to go through a couple of steps to enable login into your Amazon Connect instance. See detailed instructions here.
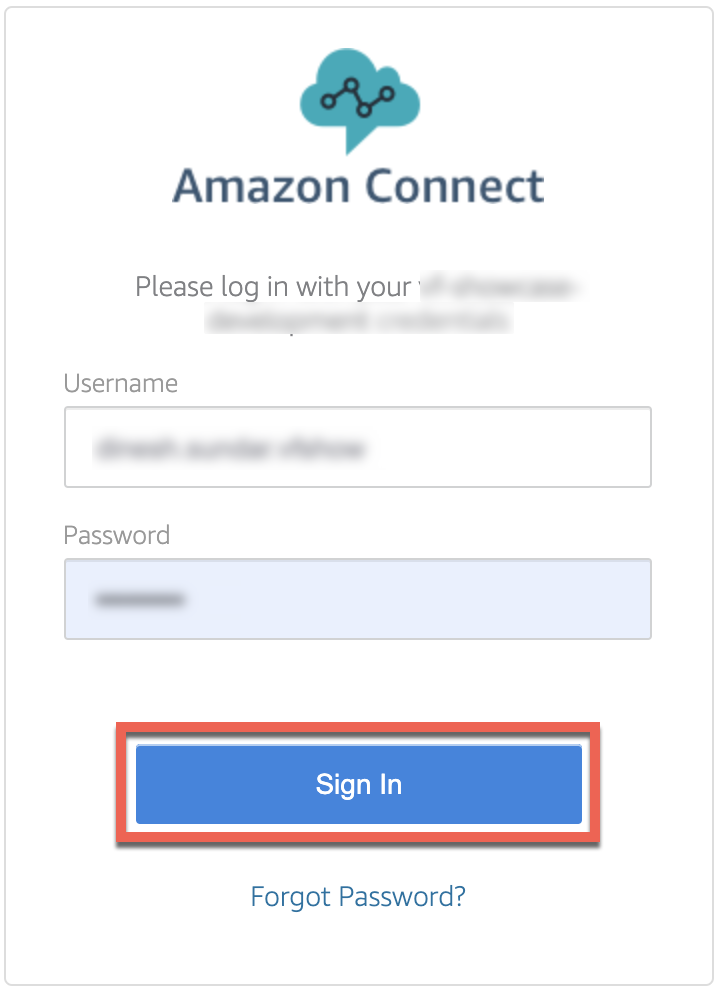
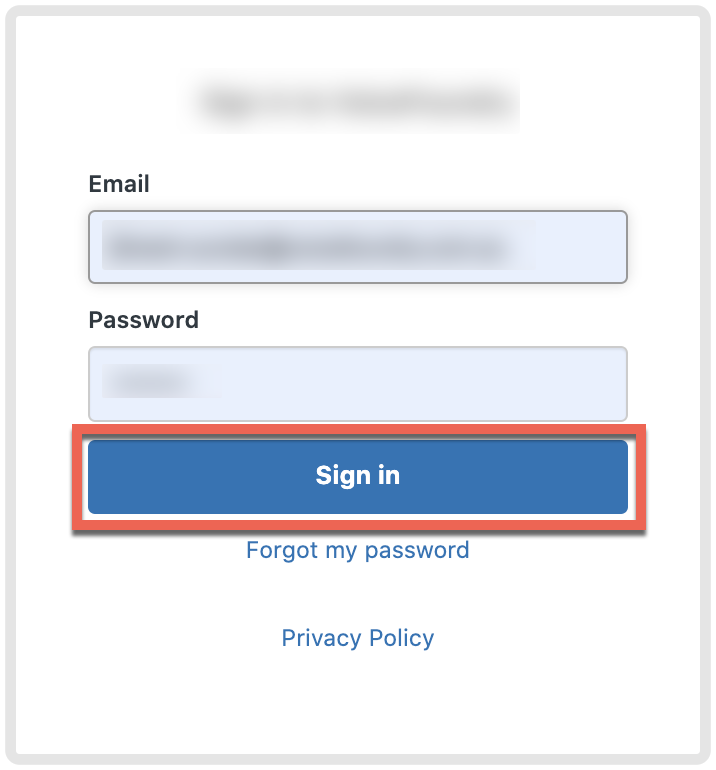
After login to Connect is enabled, a separate tab will open with the Amazon Connect sign in screen. If your Amazon Connect instance is configured with single sing-on (SSO), you don’t need to do anything, the tab should auto-close after a couple of seconds. If an SSO is not configured, provide your Amazon Connect credentials in the form displayed. Once you type in your credentials and have successfully signed in, the Amazon Connect tab will automatically close. The Connect softphone will load in Zendesk.
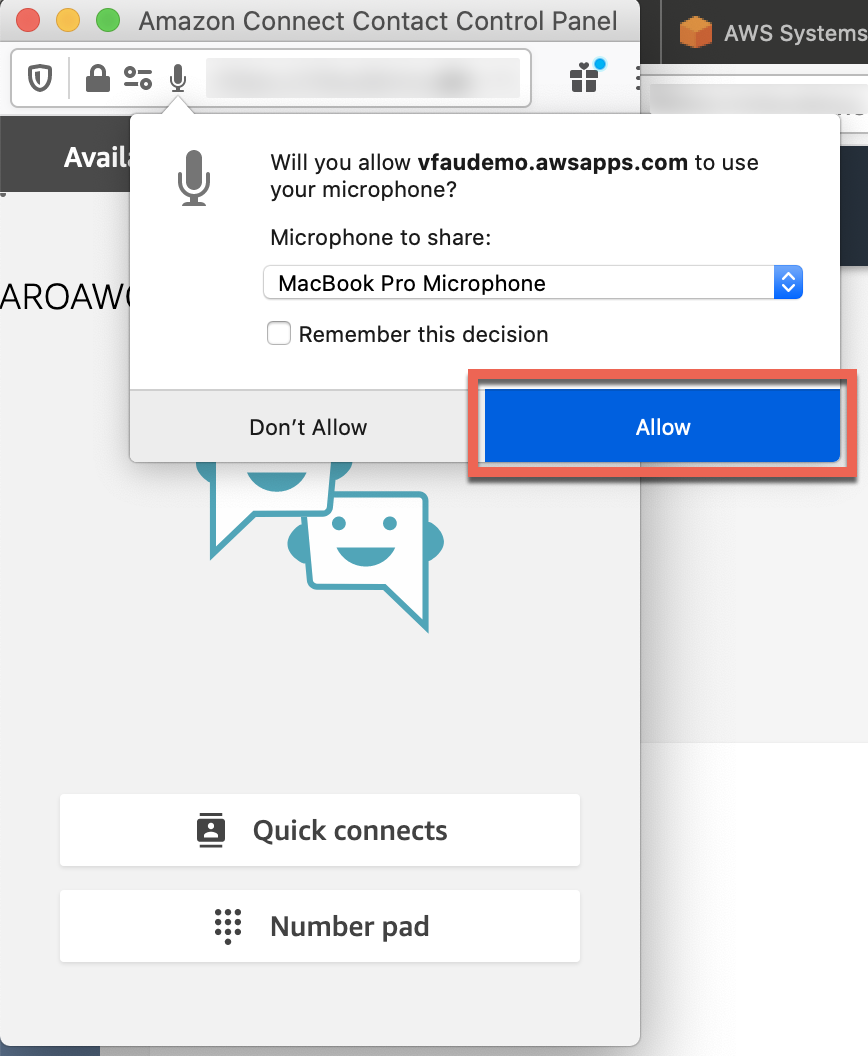
Make sure you enable pop-ups and allow the use of the microphone
From release 2.5 onwards ticket comments look and feel has changed. There’s no initial internal note on ticket creation and contact details have been streamlined with the introduction of Zendesk TPE v2 voice comment. Therefore the screen examples below may not reflect the actual view. We will update them in due course.
Assignment modes
From release 2.6 onwards ticket creation rules have slightly changed, especially around edge case scenarios. Please refer to updated examples of behaviour below for inbound and outbound contacts and the role that the ticket_assignment attribute plays in it.
Contact flow attribute ticket_assignment determines the behaviour of creating a new ticket, a new user, or attaching a call to an existing ticket, based on various circumstances and other attributes that were set in your contact flow. The ticket_assignment attribute can take one of the following three values:
auto: this is the default value and is implicitly assumed if the attribute is not set within your contact flow. In this mode the app attempts to automatically create and/or assign the current contact (call or chat) to a ticket. In an edge case scenario, when automatic action cannot be determined, the app will flip assignment mode toagent(see below), which in turn will allow you, the agent, to take appropriate action.agent: in this mode (also called manual assignment) the app won't do anything automatically but will instead give you a chance to first select or validate an existing user, or create a new one where necessary, and then create a new ticket for them, or find an existing ticket and then attach the contact to it. Setting this mode in a contact flow can be conditional, based on business rules.force: this value behaves similar toauto, except that in edge case scenarios the app won't flip intoagentmode, but will instead take an appropriate fallback action to ensure each call gets assigned to a ticket. This may result in a new ticket created with you, the agent, as the requestor. In such case you or your supervisor will then need to merge the ticket to appropriate user or other ticket. Theforcemode also affects behaviour of transfers (see the Transfers section below).
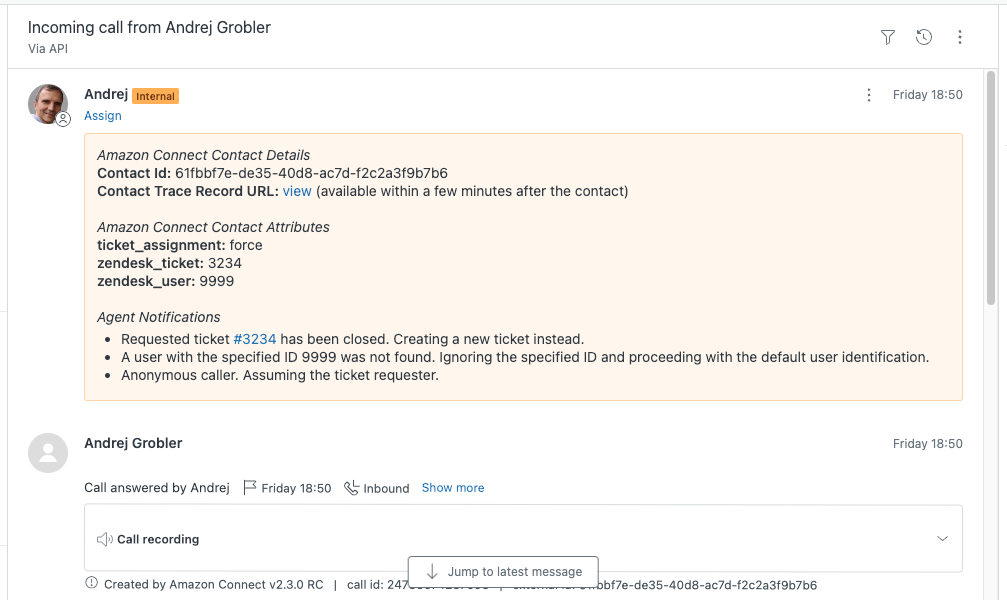
When the app decides to flip from auto to agent mode, or when it takes a fallback action in force mode due to edge circumstances, it will display a warning popup notification to you. These notifications will also be added to the ticket's internal note under the Agent Notifications section.
Inbound calls (auto assignment)
The following apply when the ticket_assignment attribute has been set to auto in your contact flow. If the ticket_assignment attribute has not been set within your contact flow, it will default to auto. Unless specifically called out, the same applies for the force assignment mode.
Recognised caller
If an agent answers a call from a recognised number, a new ticket is automatically created and attached to this user.
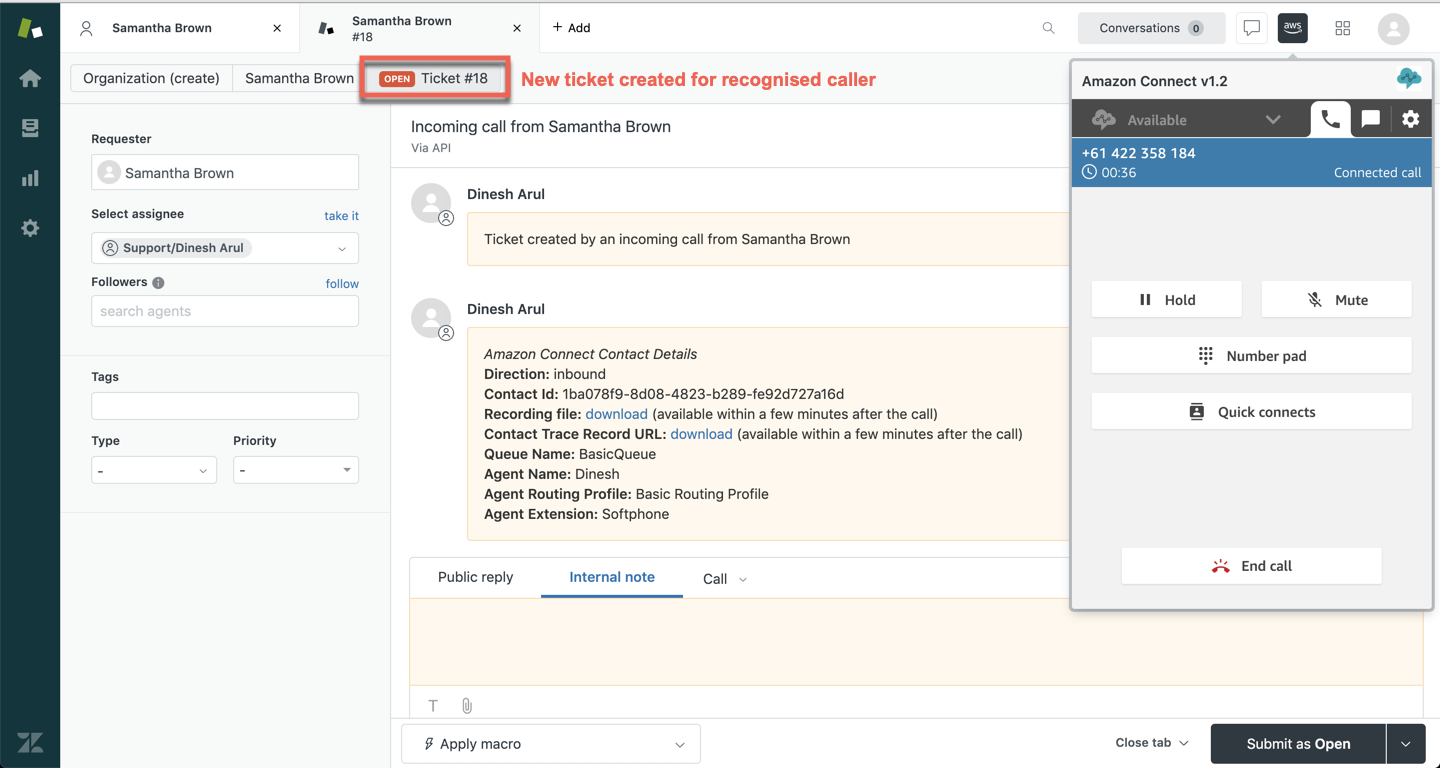
If the call is related to an existing ticket, the agent can merge the newly created ticket into the existing one.
Unrecognised caller
If an agent answers a call from an unrecognised number, a new user is created with the unrecognised number attached to it and a new ticket is attached to this user.
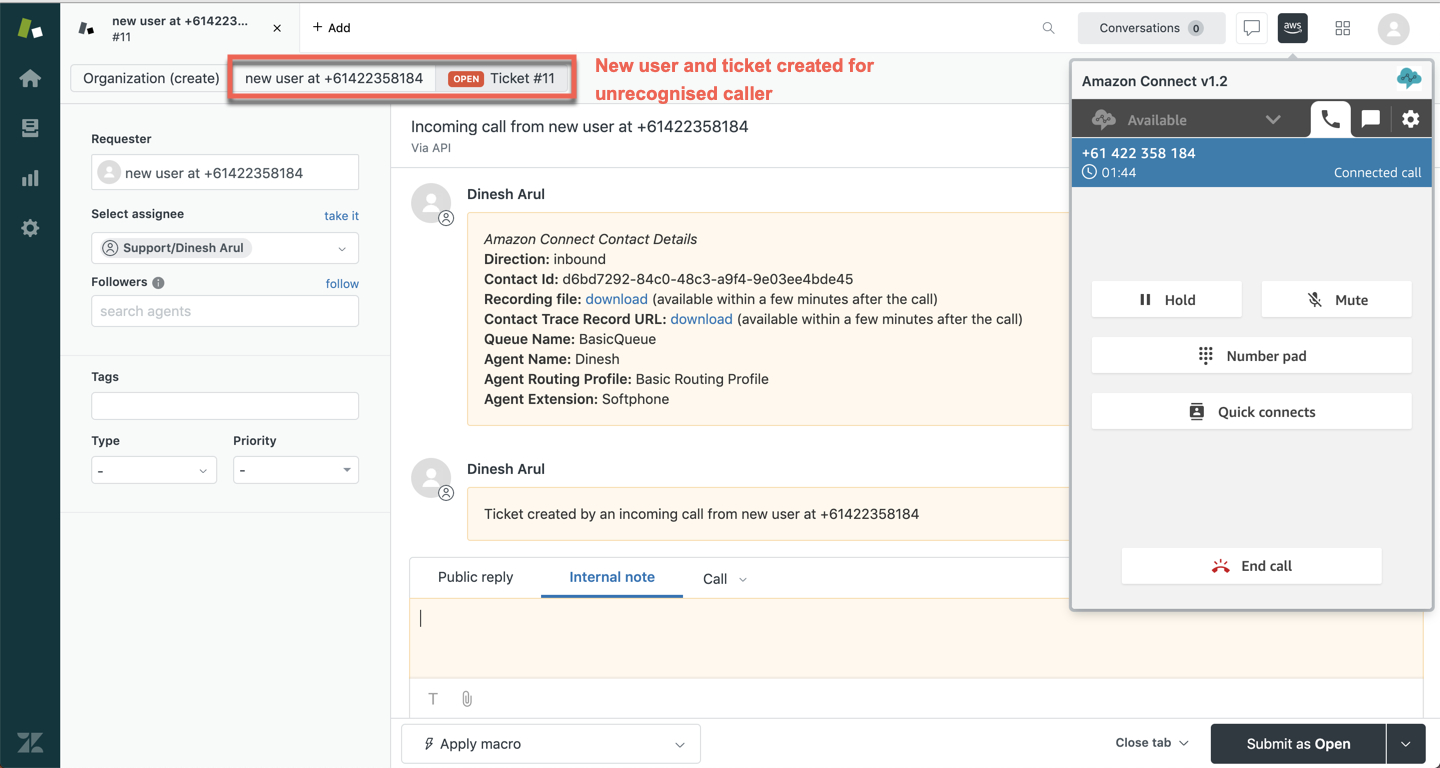
If the caller is an existing user, the agent will need to merge the newly created user into the existing one. If the call is related to existing ticket, the agent can merge the newly created ticket into the existing one.
Anonymous caller
If an agent answers a call from an anonymous/private number, the app will switch the assignment mode from auto to agent. This will allow the agent to select an existing (or create new) user and create a ticket or attach the call to existing one. See the section below on Inbound calls with manual assignment.
If however the assignment mode is set to force, a new ticket is automatically created with the agent as the requester. The agent can then either find an existing user or create a new one and change the ticket requester to that user.
Ticket number attribute
The zendesk_ticket attribute allows for callers to enter a ticket number within an IVR, and have that ticket pop for the agent when they answer the call.
The following apply if the zendesk_ticket attribute has been set in your contact flow.
Recognised caller
If an agent answers a call from a recognised number and the caller has entered a valid ticket number, the specified ticket will pop for the agent.

If an agent answers a call from a recognised number and the caller has entered an invalid ticket number, or a number of a closed ticket, or if the ticket number does not match back to the caller, the app will switch the assignment mode from auto to agent. This will pop the recognised caller and allow the agent create a ticket or attach the call to existing one.
If assignment mode was set to force then a new ticket is automatically created for the recognised caller.
Unrecognised caller
If an agent answers a call from an unrecognised number and the caller has entered a ticket number, the app will switch the assignment mode from auto to agent. If it’s a valid ticket number, the ticket will pop and the agent will be able to verify the user and attach the call to the ticket. If the ticket is invalid or closed an alert will be displayed to the agent and they will be able to create a new ticket and user, as appropriate.
When the assignment mode is set to force and a valid ticket has been given, the call will get attached to that ticket. If the specified ticket is invalid, a new user is created and a new ticket is attached to this user. If the ticket is closed, then a new ticket is created for the original ticket requester.
If the caller turns out to be an existing user (eg. via email), the agent will need to merge the newly created user into the existing one. If the call is related to existing ticket, the agent can merge the newly created ticket into the existing one.
Anonymous caller
If an agent answers a call from an anonymous number and the caller has entered a ticket number, the app will switch the assignment mode from auto to agent. If it’s a valid ticket number, the ticket will pop and the agent will be able to verify the user and attach the call to the ticket. If the ticket is invalid or closed an alert will be displayed to the agent and they will be able to create a new ticket and user, as appropriate.
When the assignment mode is set to force and a valid ticket has been given, the call will get attached to that ticket. If the specified ticket is invalid, a new ticket is created for the agent as requester. If the ticket is closed, then a new ticket is created for the original ticket requester.
Recent ticket attribute
The recent_ticket_timeout attribute and create ticket after minutes app setting allows for a recent ticket of a recognised caller to pop for the agent instead of creating a new ticket. For example, if the recent_ticket_timeout attribute or create ticket after minutes app setting is set to 15, a new ticket will only be created if there hasn’t been a ticket created or updated within the last 15 minutes for that recognised caller.
The following apply if the recent_ticket_timeout attribute has been set in your contact flow, or if the create ticket after minutes app setting has been set within the app’s settings.
Recognised caller
If an agent answers a call from a recognised number and the caller has a recently created or updated ticket within the specified timeframe, then that latest ticket will pop for the agent and the call will be automatically attached to it.
If an agent answers a call from a recognised number and the caller has a recently created or updated ticket outside of the specified timeframe, then a new ticket is automatically created for the recognised caller.
If the call is related to an existing ticket, an agent can merge the newly created ticket into the existing one.
Unrecognised caller
If an agent answers a call from an unrecognised number a new user is created with the unrecognised number attached to it and a new ticket is attached to this user, regardless of the recent_ticket_timeout attribute value or create ticket after minutes app setting. Essentially, behaviour is the same as if no ticket id or recent ticket timeout setting had been provided.
If the caller is an existing user, the agent will need to merge the newly created user into the existing one. If the call is related to existing ticket, the agent can merge the newly created ticket into the existing one.
Anonymous caller
Similar to Unrecognised caller above, the behaviour is the same as if no ticket id or recent ticket timeout setting had been provided. See Anonymous caller at the start of this section.
Inbound calls (manual assignment)
The following apply when the ticket_assignment attribute has been set to agent in your contact flow.
Recognised caller
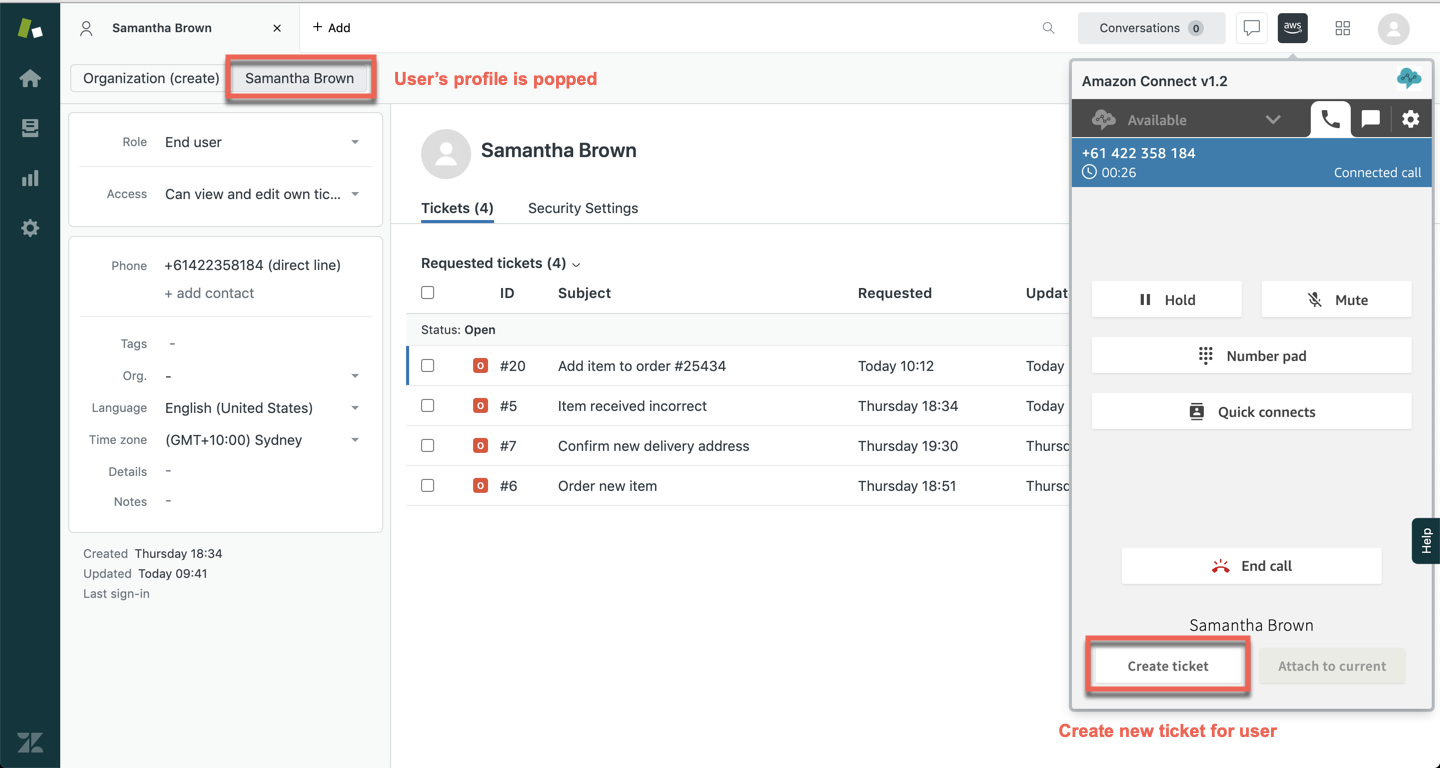
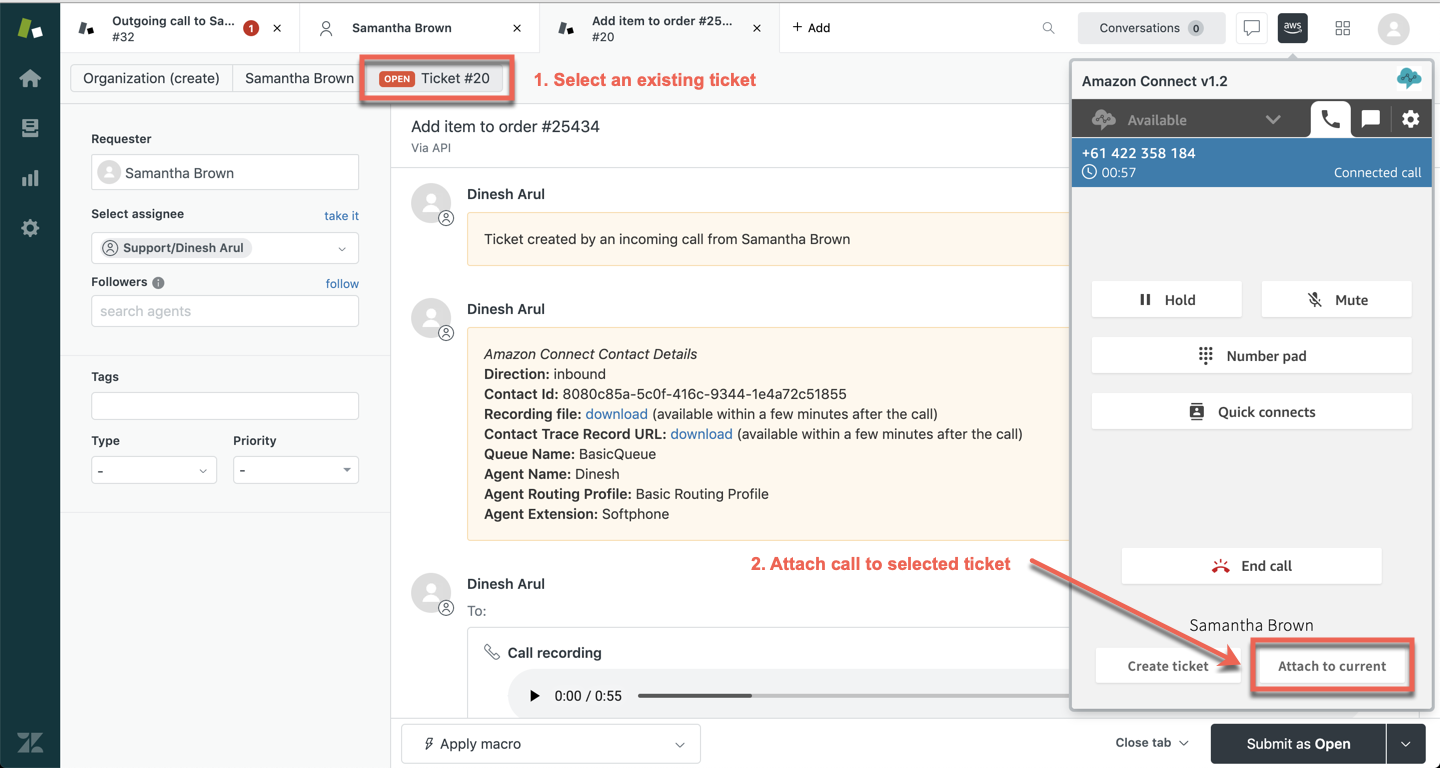
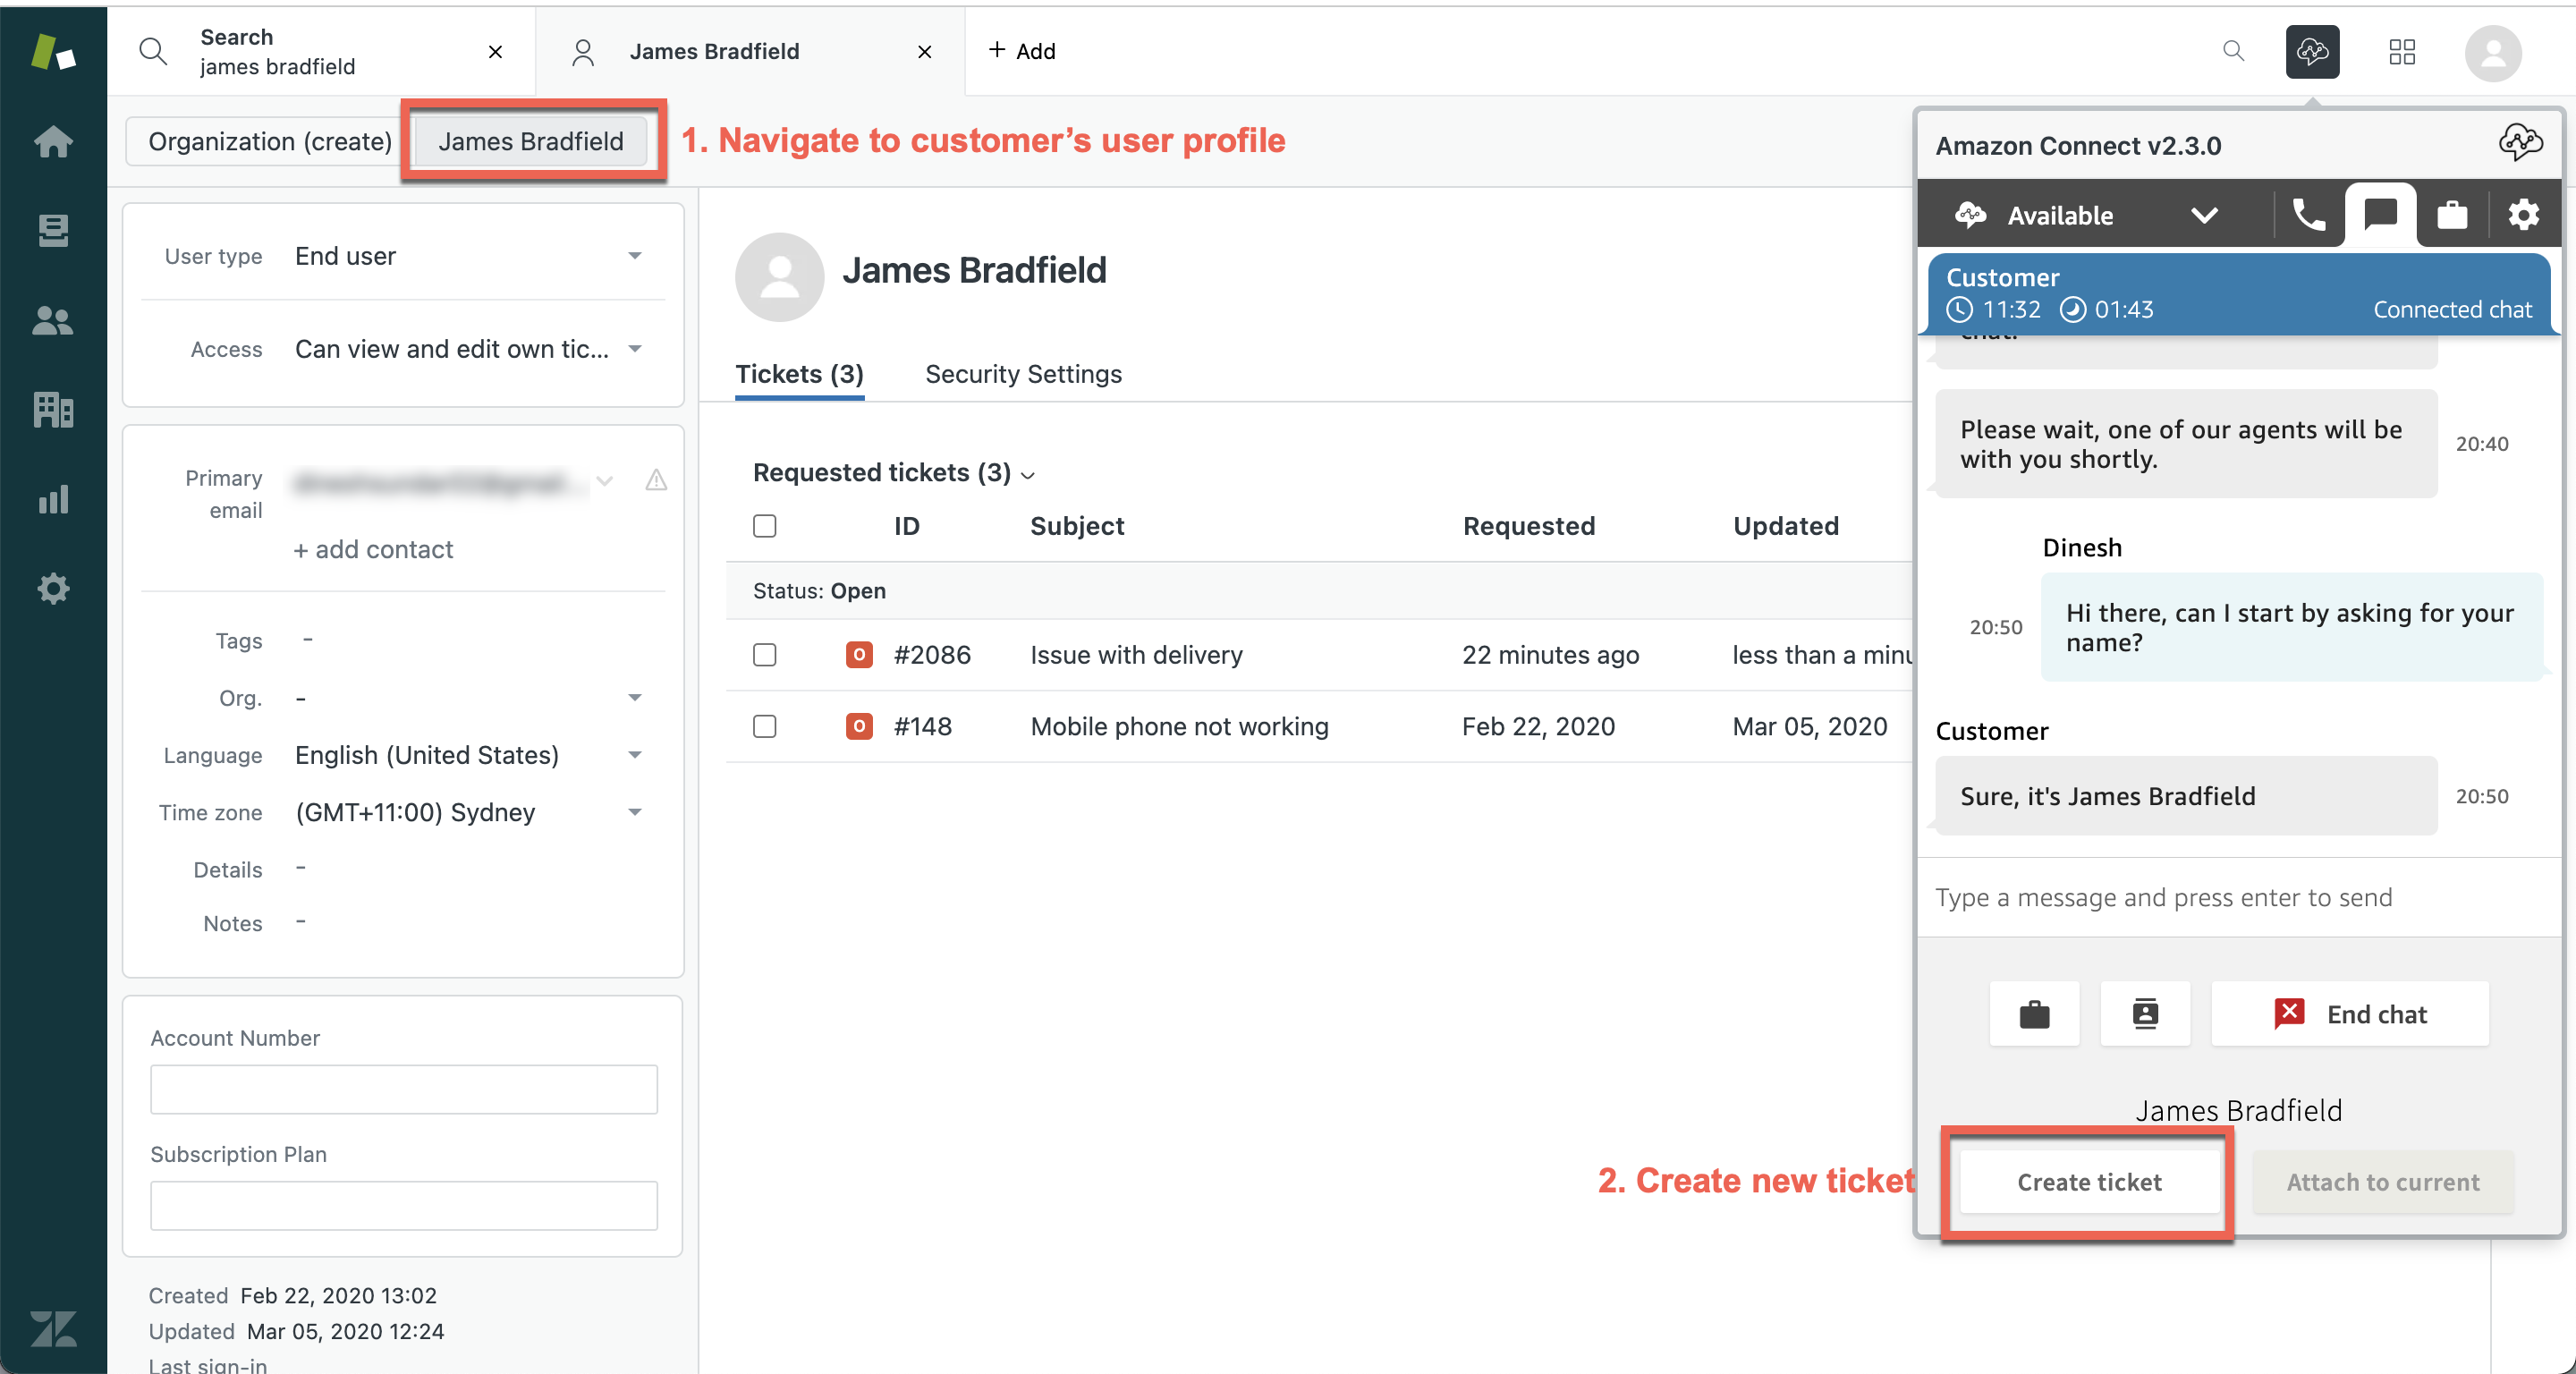
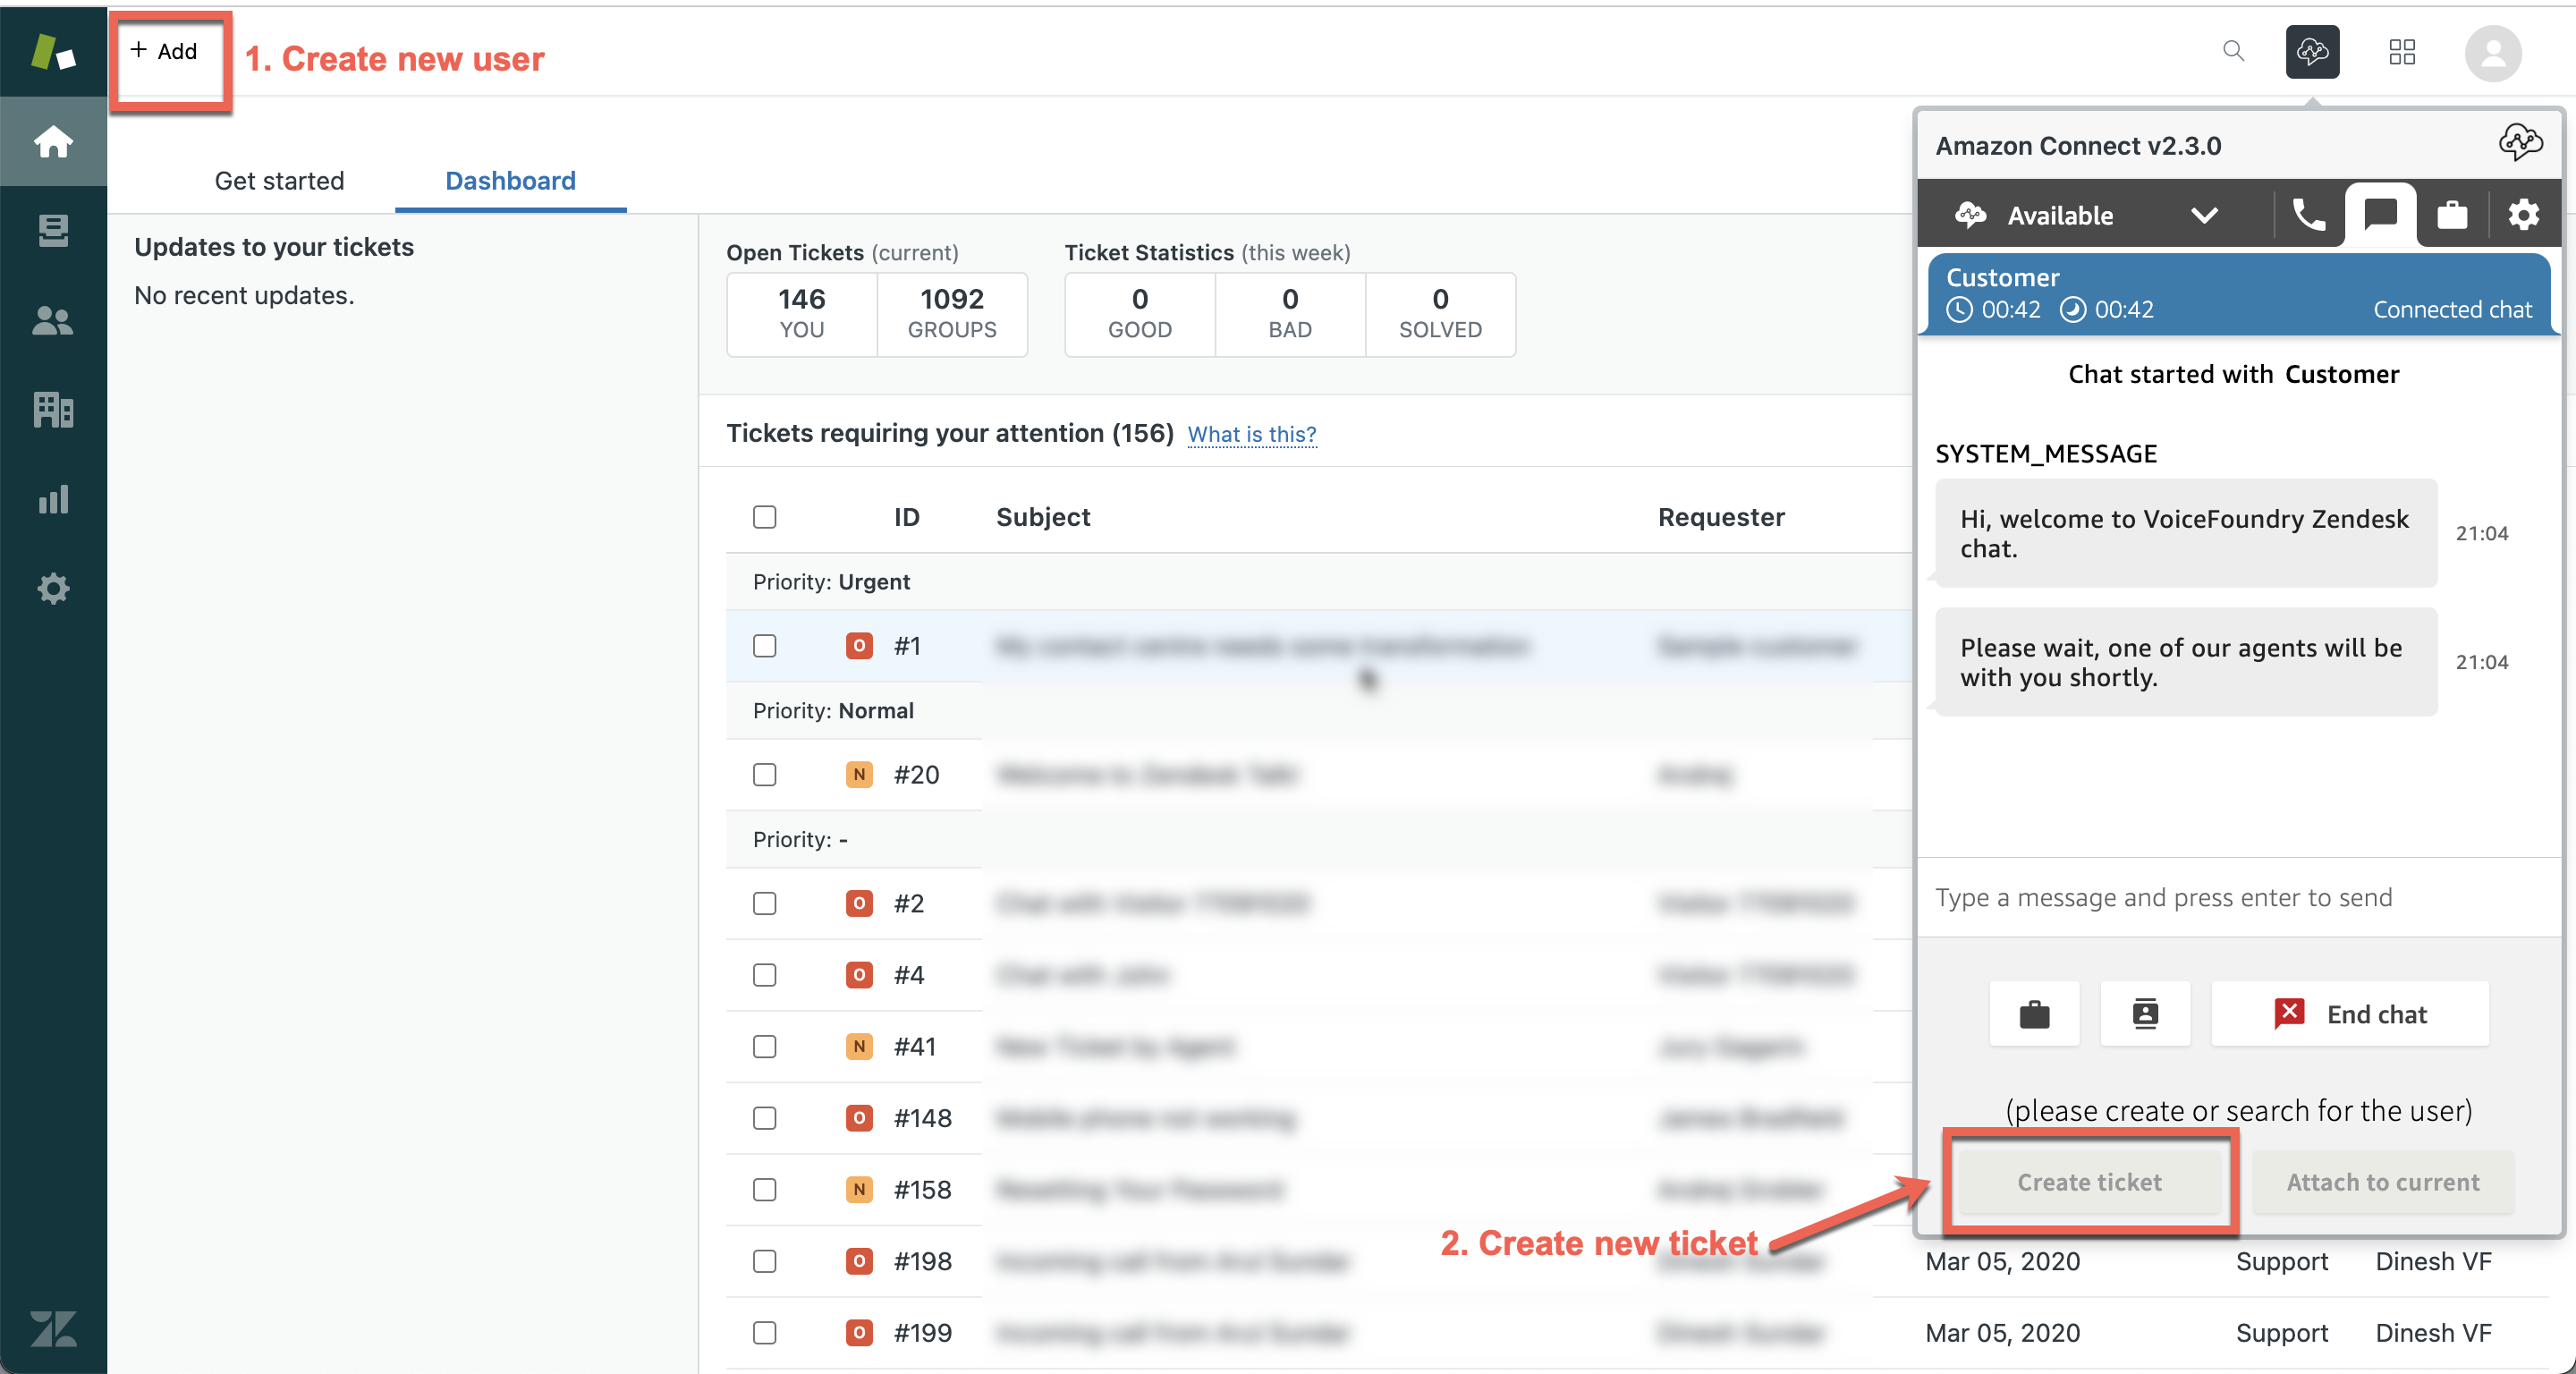
If an agent answers a call from a recognised number, that user’s profile is popped and the agent has the option of either clicking on the create ticket button to create a ticket for that user or if the call relates to one of the user’s existing tickets the agent can open an existing ticket and then click on the attach to current button to attach the call to it.

Unrecognised caller
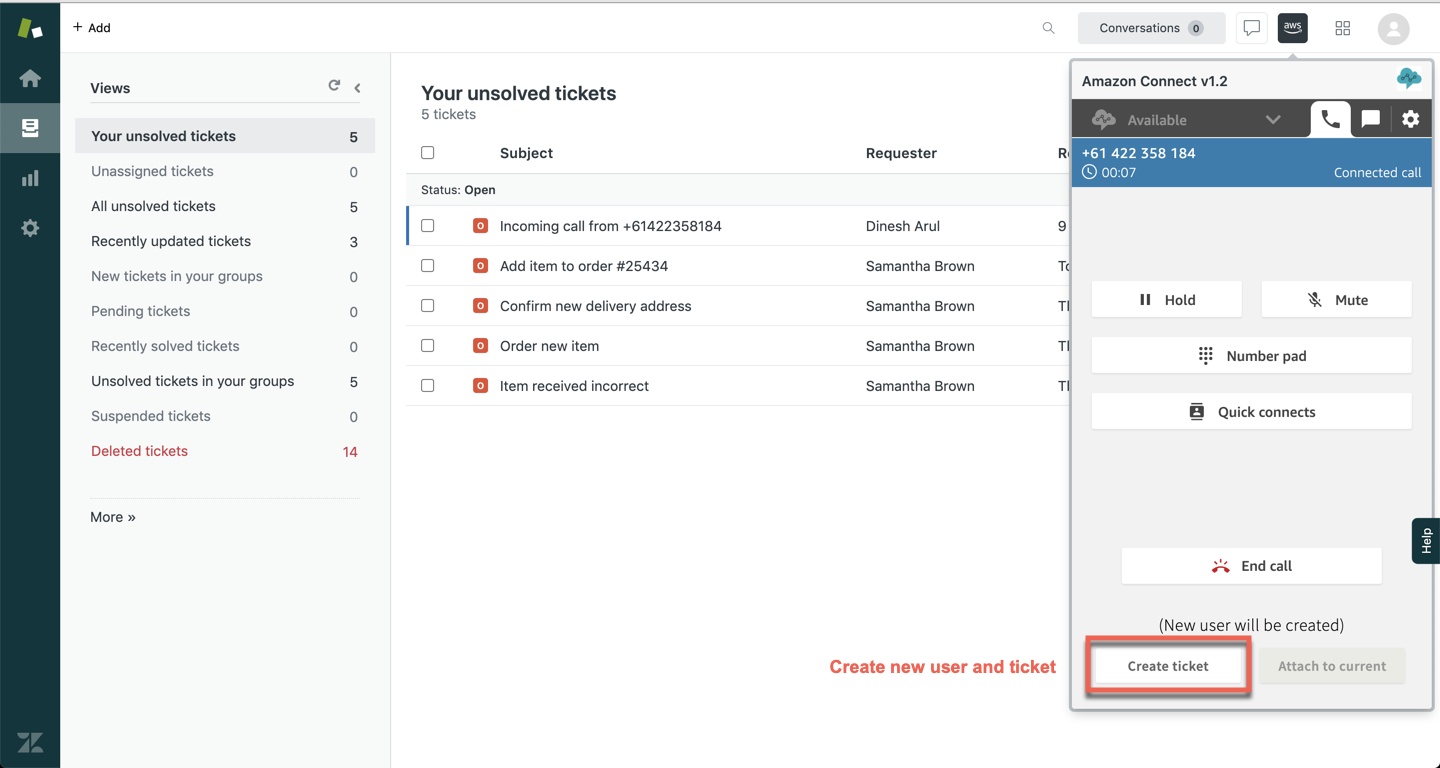
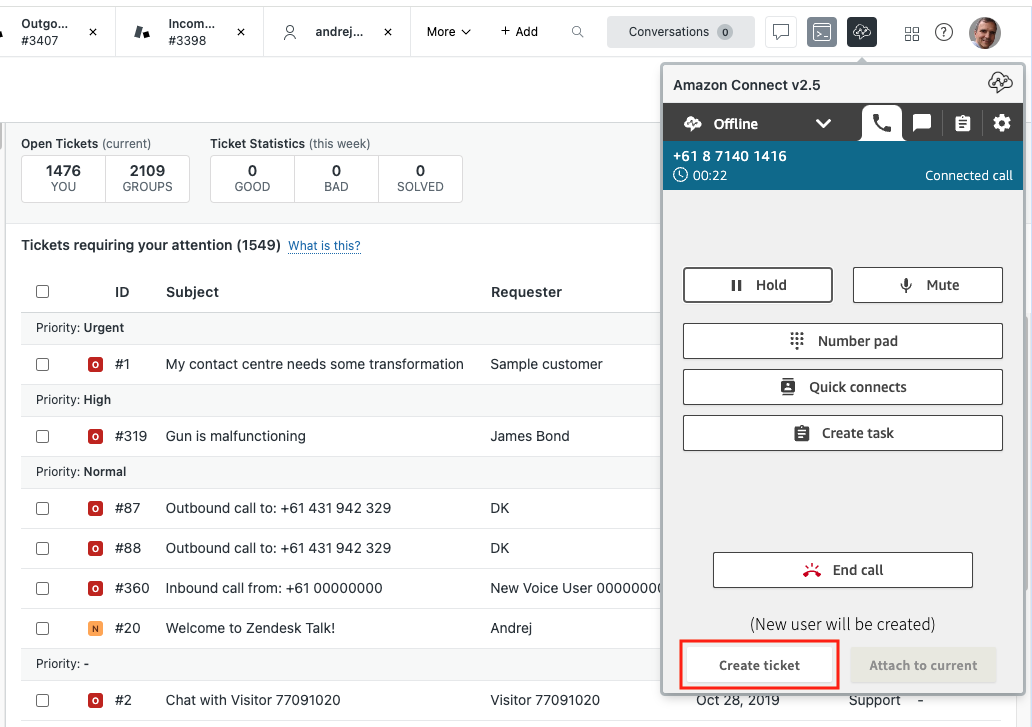
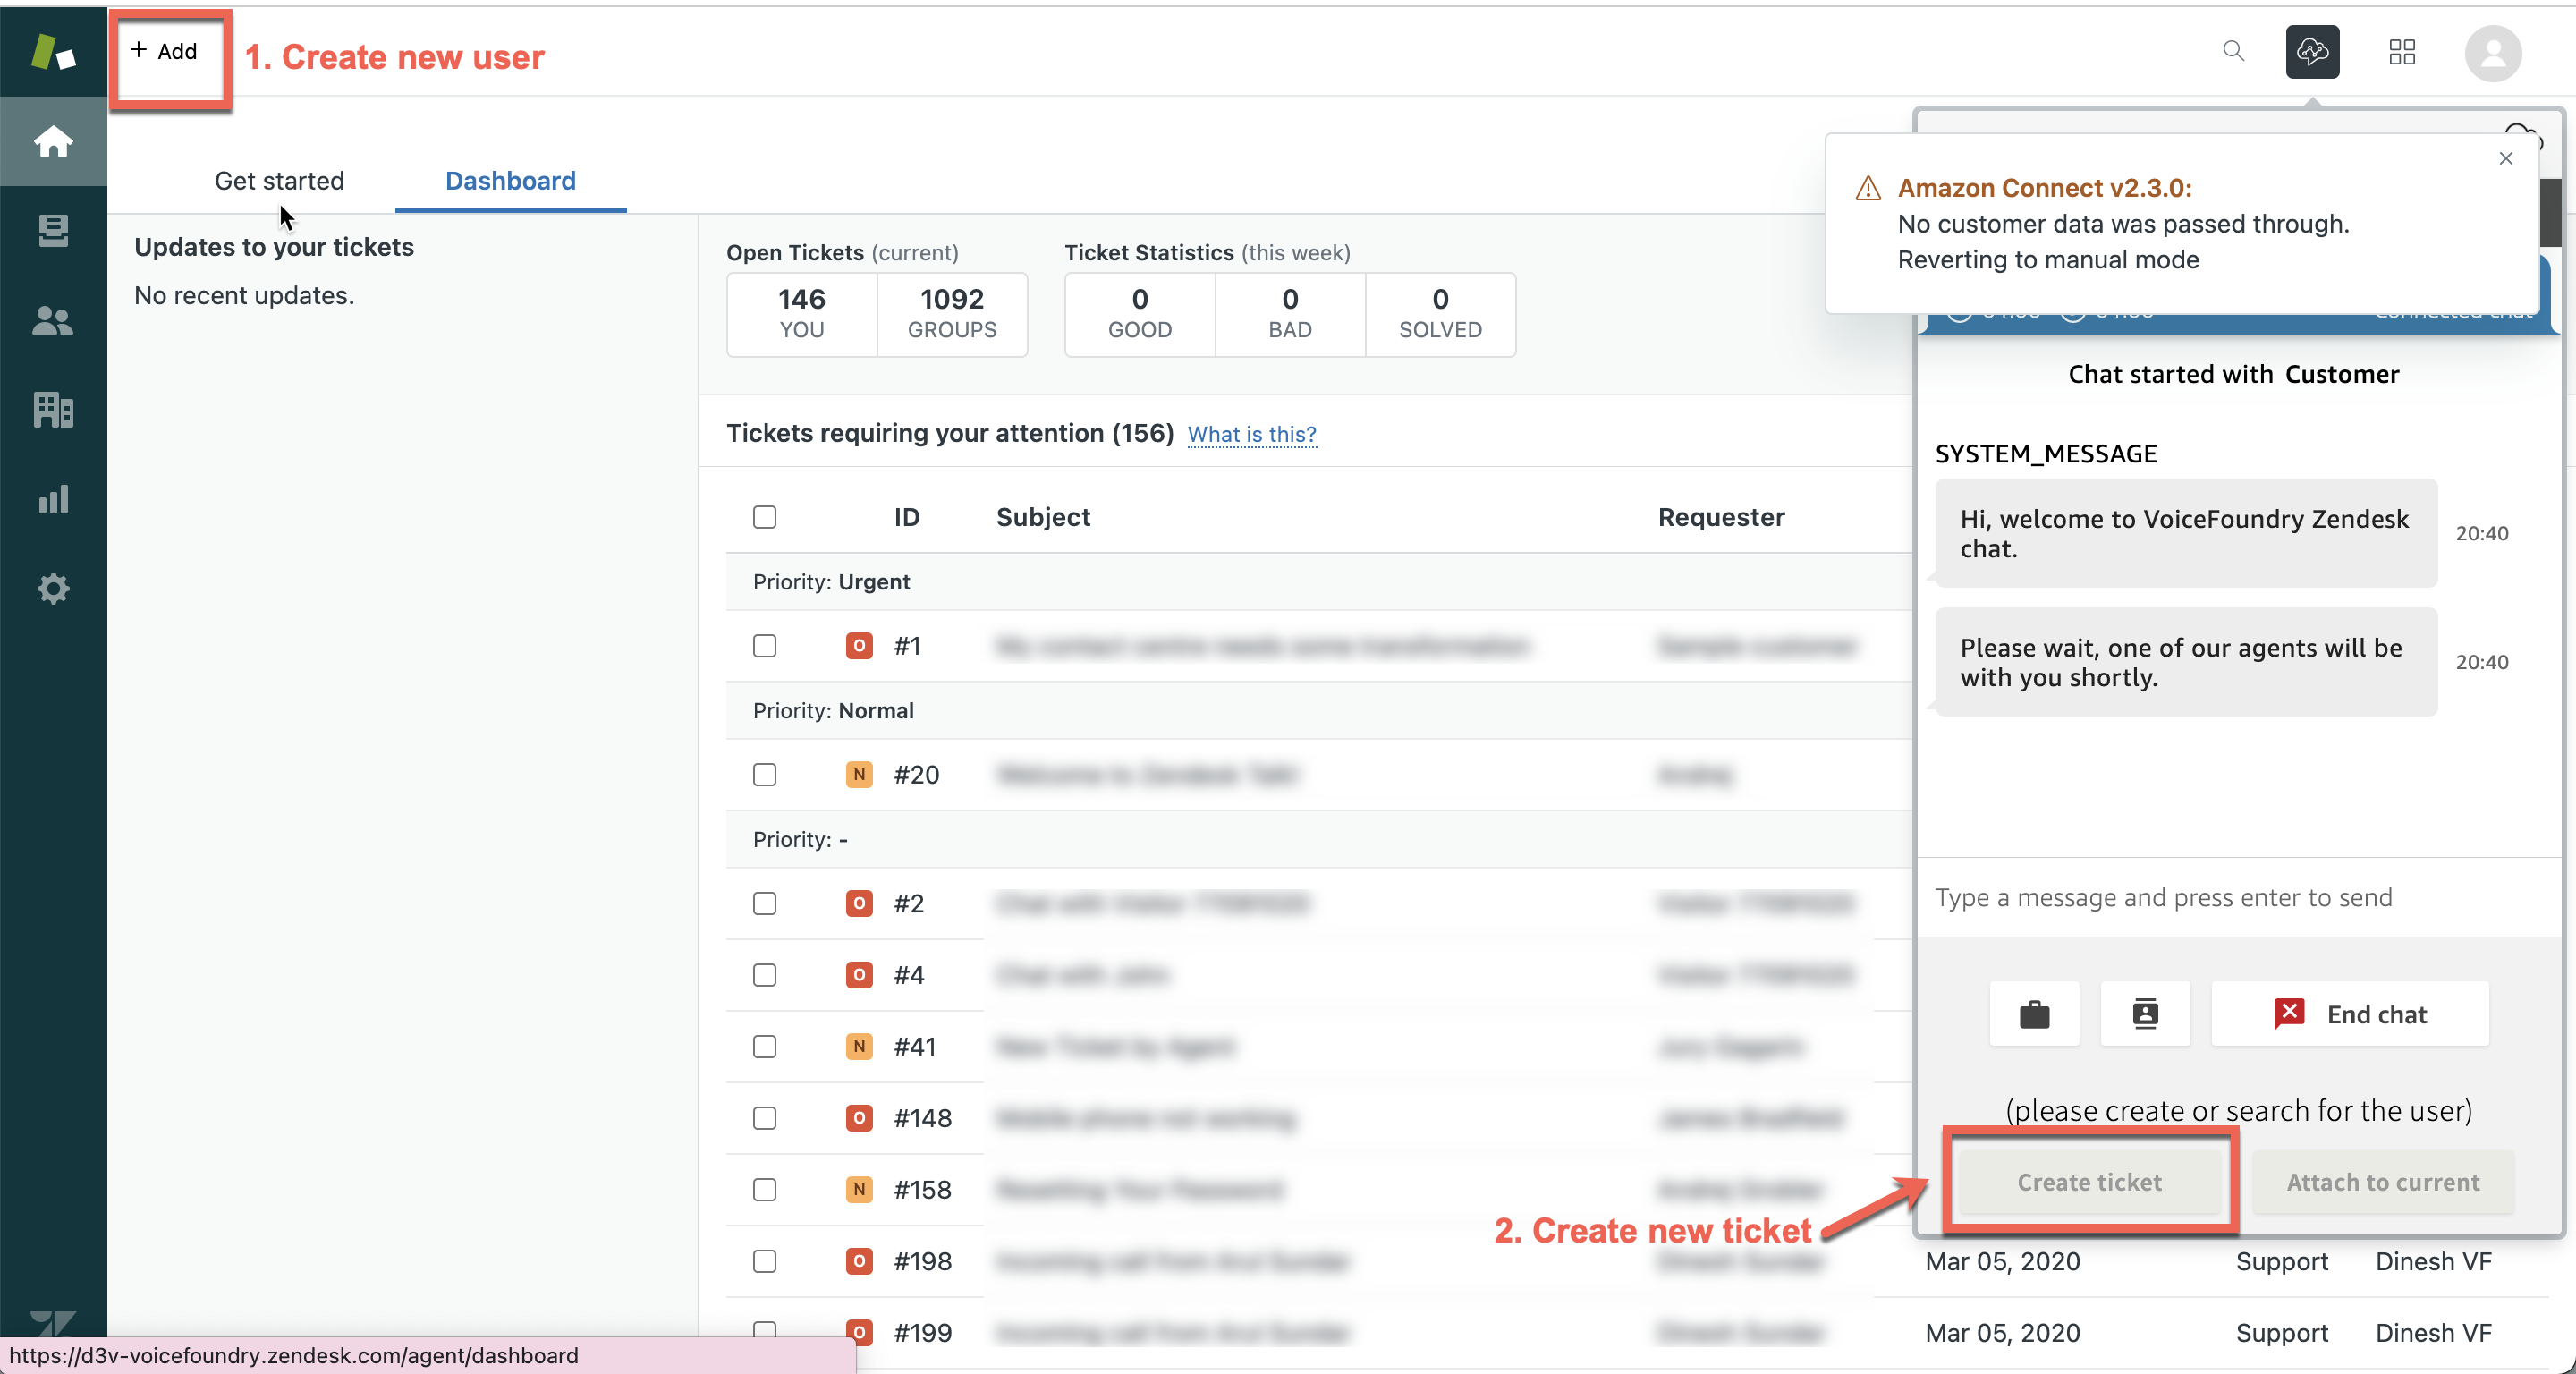
If an agent answers a call from an unrecognised number, the agent can click on the create ticket button to create a new user with the unrecognised number attached to it and a new ticket attached to this user.
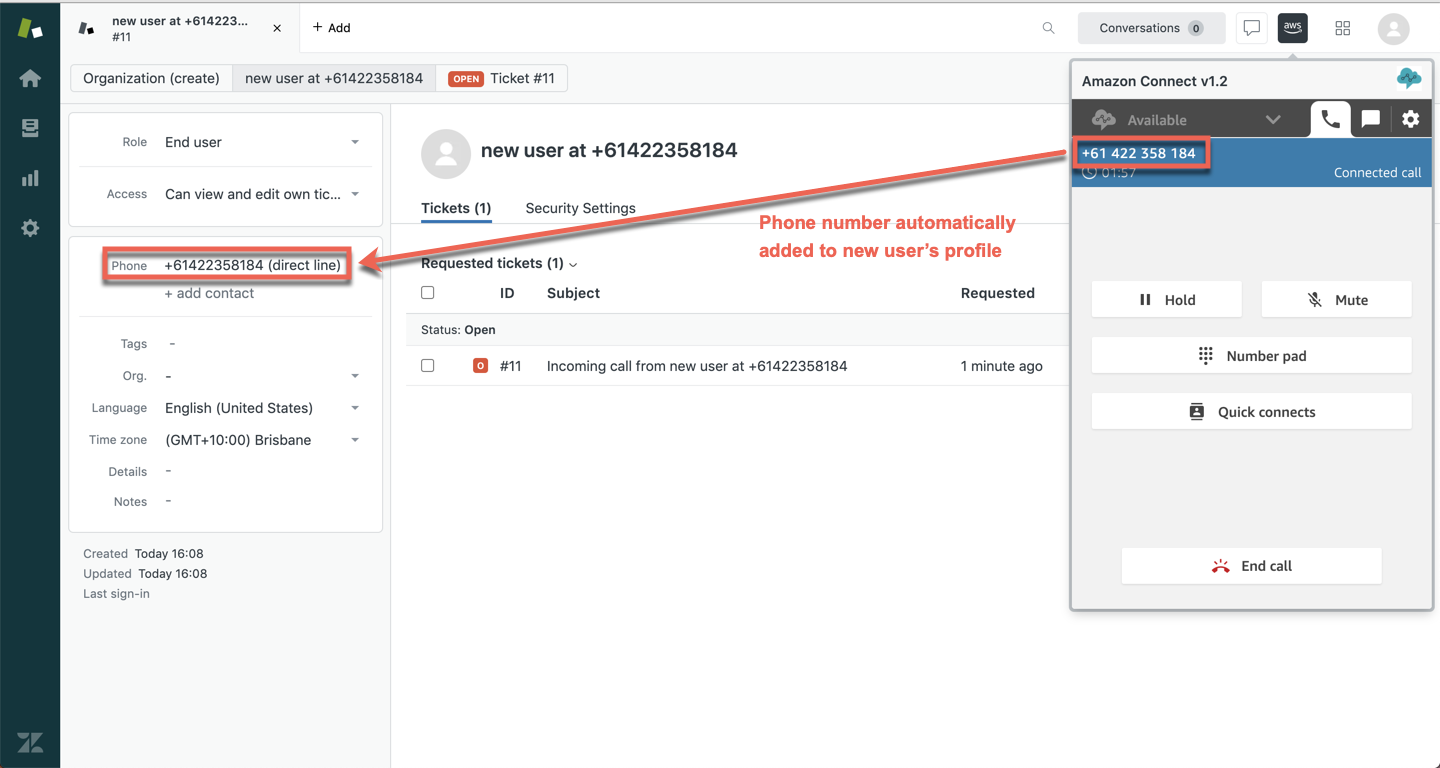
Alternatively, the agent can first identify the caller and if they are an existing user the agent can navigate to the existing user’s profile and click on the create ticket button to create a ticket for that user. The contact number is automatically added to the user’s profile.
In a scenario where the agent didn’t find an existing matching user but has already clicked through some of them to verify their details, the selected user in the softphone would have changed to that user. The agent now needs to add a new user in Zendesk, to ensure the ticket gets assigned to this new user.
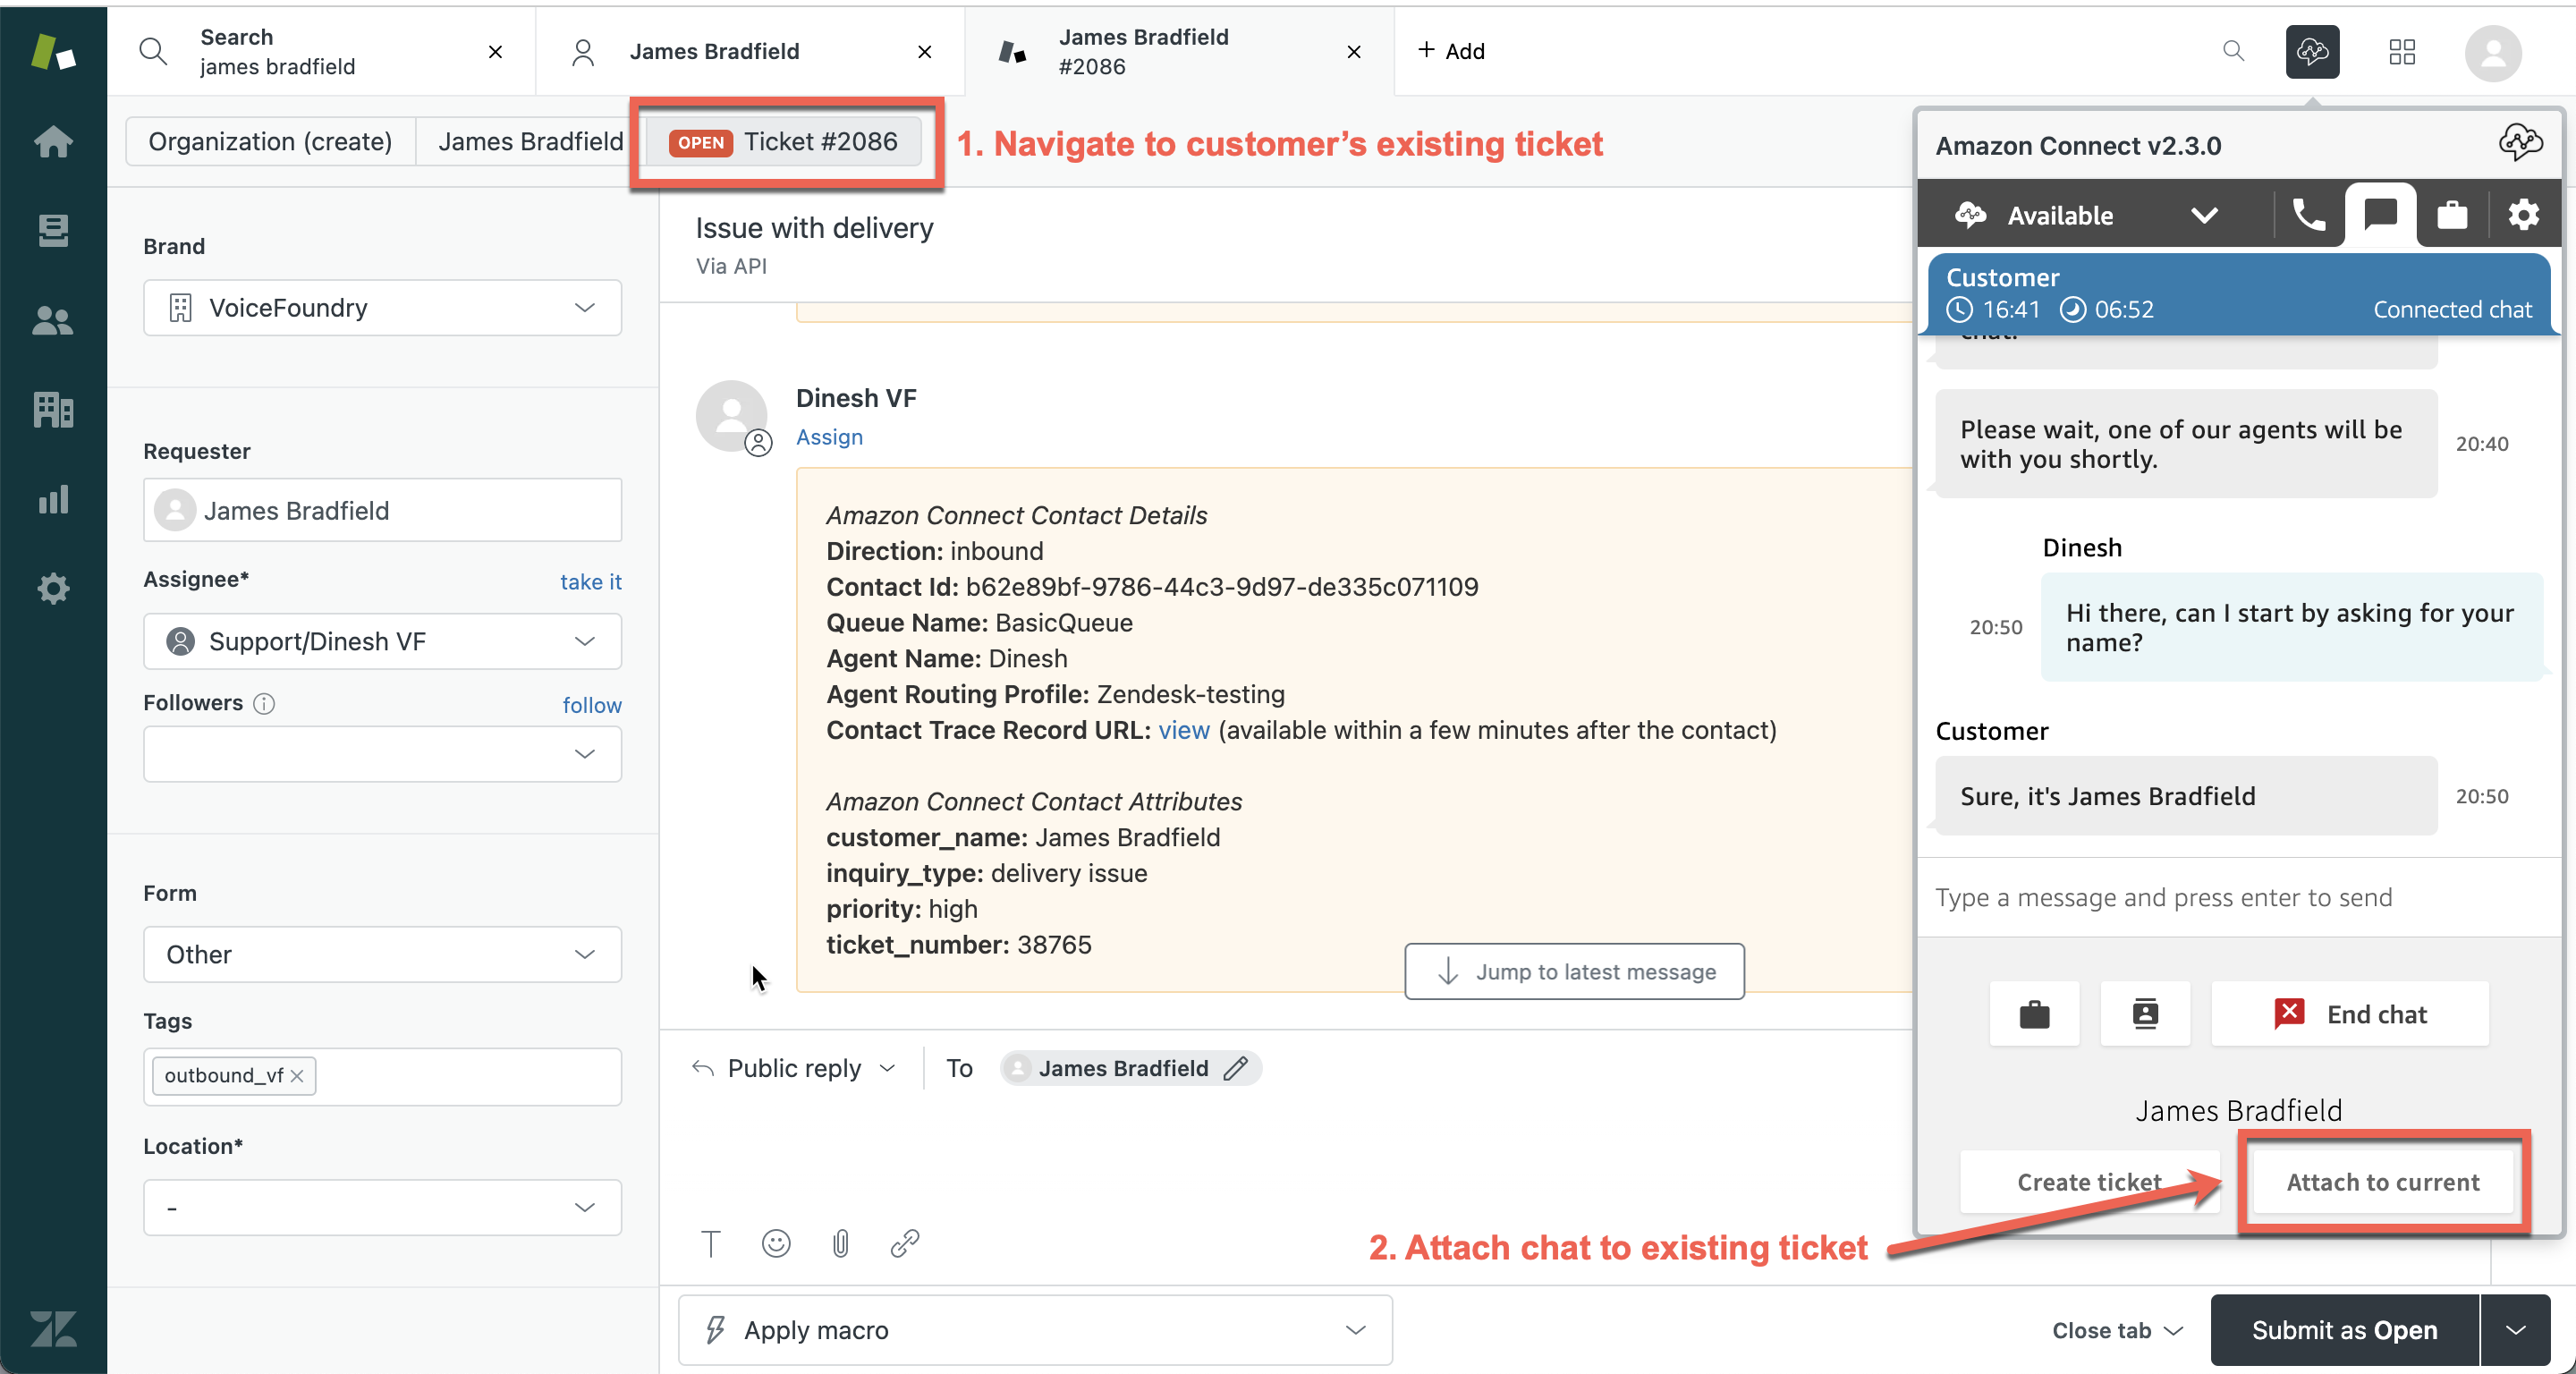
The agent may also establish if the call relates to one of the user’s existing tickets and attach the call to it by opening the ticket and then clicking on the attach to current button.
If the user doesn’t have a phone number in their user profile yet the number they’ve called from (CLI) is automatically added. An example of this is when the user first contacts support via email, which is then followed by a phone call.
It may take up to a few minutes for contact numbers to get automatically added to a user’s profile.
Anonymous caller
If an agent answers a call from an anonymous number, the agent can click on the create ticket button to create a new ticket with the agent as the requester. The agent can then either find an existing user or create a new one and change the ticket requester to that user.
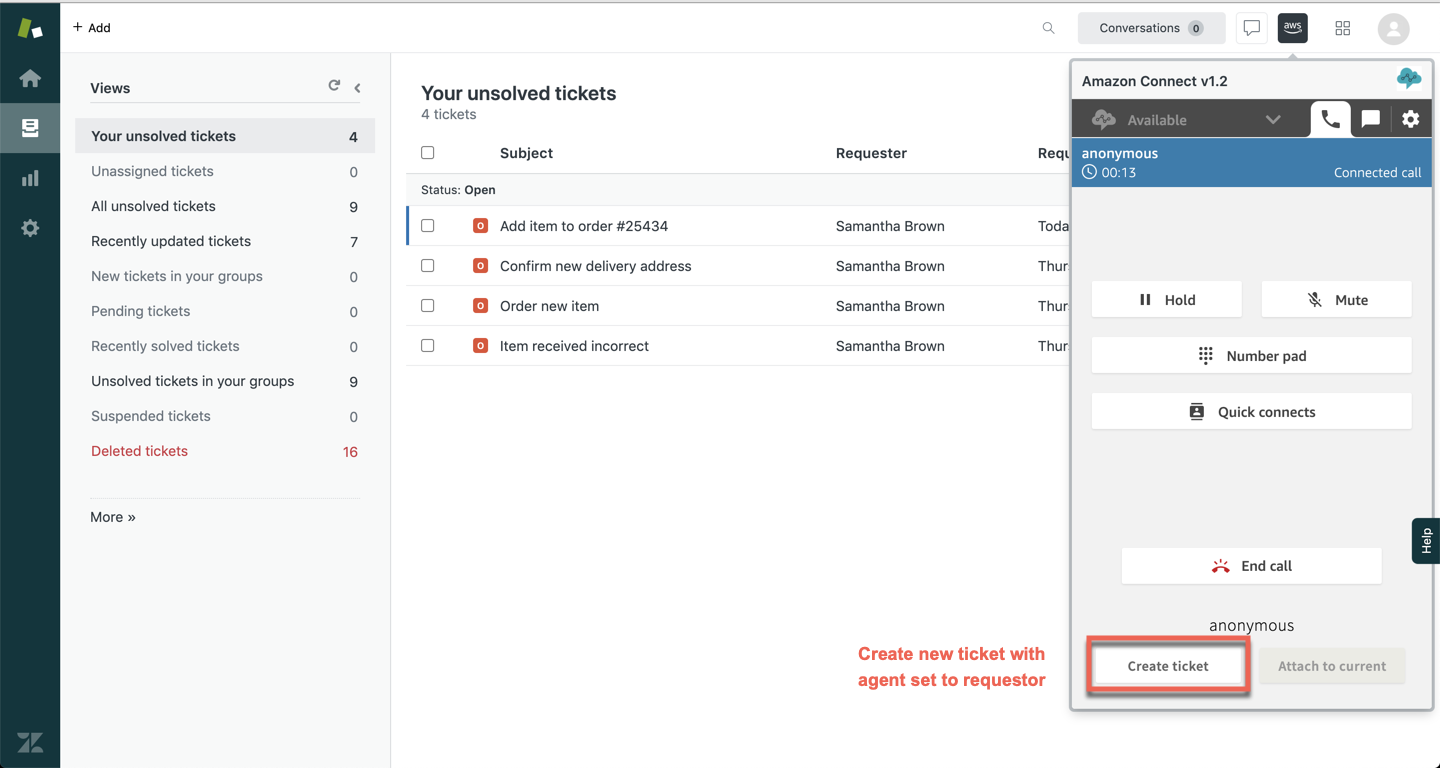
Alternatively, the agent can first identify the caller and if they are an existing user the agent can navigate to the existing user’s profile and click on the create ticket button to create a ticket for that user.
The agent may also establish if the call relates to one of the user’s existing tickets and attach the call to it by opening the ticket and then clicking on the attach to current button.
Ticket number attribute
The zendesk_ticket attribute allows for callers to enter a ticket number within an IVR, and have that ticket pop for the agent when they answer the call.
The following apply if the zendesk_ticket attribute has been set in your contact flow.
Recognised caller
If an agent answers a call from a recognised number and the caller has entered a valid ticket number, the specified ticket is popped and the agent can attach the call to it by clicking on the attach to current button.
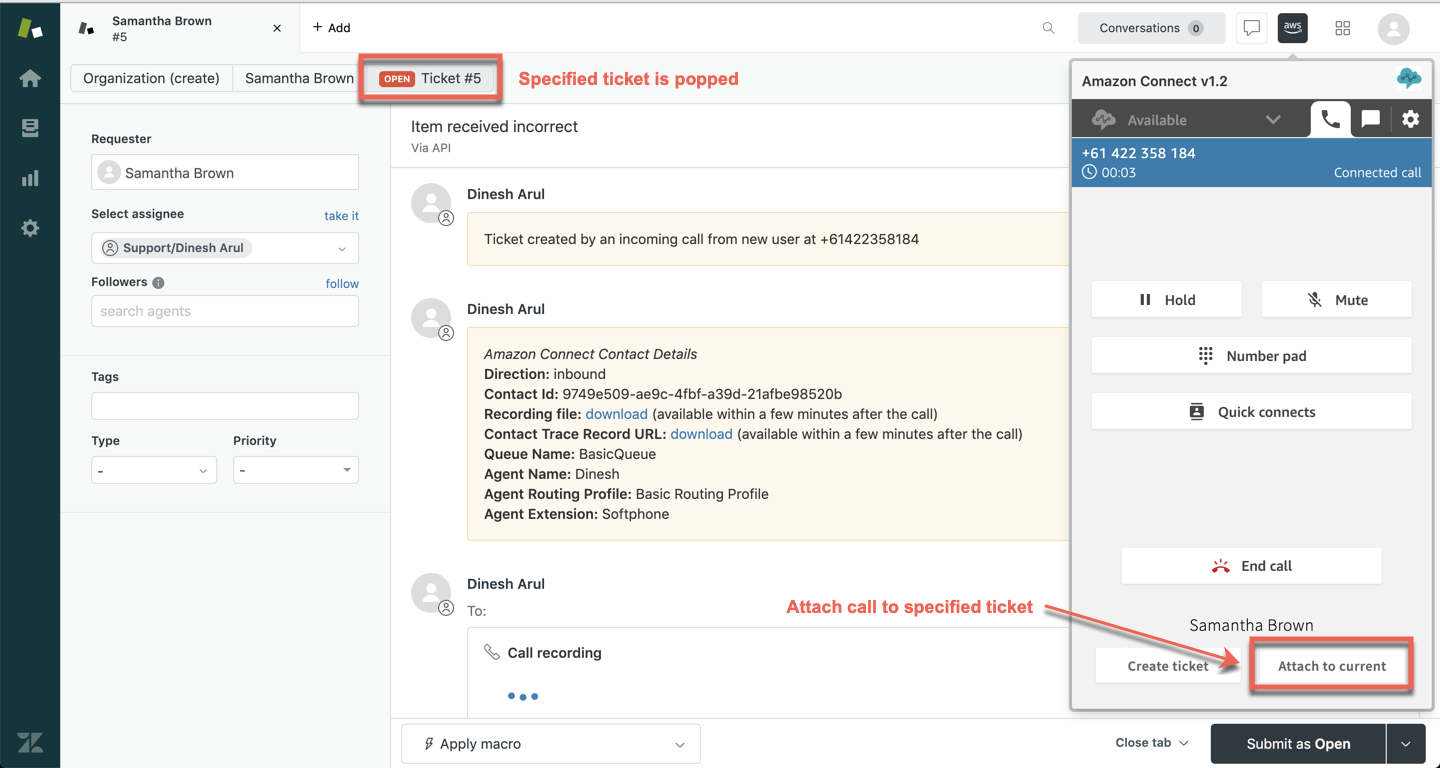
If the call is not related to the popped ticket, the agent can attach the call to a different ticket or create a new one by clicking on the create ticket button.
If an agent answers a call from a recognised number and the caller has entered either an invalid ticket number or the ticket does not match back to the caller, that user’s profile is popped and the agent has the option of either clicking on the create ticket button to create a ticket for that user or if the call relates to one of the user’s existing tickets the agent can open an existing ticket and then click on the attach to current button to attach the call to it.
Unrecognised caller
If an agent answers a call from an unrecognised number and the caller has entered a valid ticket number, the specified ticket is popped and the agent can then identify the caller and confirm they are an existing user and the quoted ticket belongs to them before clicking on the attach to current button. The contact number is automatically added to the user’s profile, if that user doesn’t have a phone number assigned yet..

If the caller cannot be matched against the ticket or the ticket is not the intended one the agent can look for the correct ticket and user, or create a new user within the Zendesk UI and then create a new ticket for that user by clicking on the create ticket button.
If an agent answers a call from an unrecognised number and the caller has entered an invalid ticket number, no ticket or user profile is popped for the agent. The agent can click on the create ticket button to create a new user with the unrecognised number attached to it and a new ticket attached to this user.
Alternatively, the agent can first identify the caller and if they are an existing user the agent can navigate to the existing user’s profile and click on the create ticket button to create a ticket for that user. The contact number is automatically added to the user’s profile unless they already have another phone number.
The agent may also establish if the call relates to one of the user’s existing tickets and attach the call to it by opening the ticket and then clicking on the attach to current button. The contact number is automatically added to the user’s profile.
It may take up to a few minutes for new contact numbers to get automatically added to the user’s profile.
Anonymous caller
If an agent answers a call from an anonymous number and the caller has entered a valid ticket number, the specified ticket is popped and the agent can then identify the caller and confirm they are an existing user and the quoted ticket belongs to them before clicking on the attach to current button.

If the caller cannot be matched against the ticket or the ticket is not the intended one the agent can look for the correct ticket and user or create a new user within the Zendesk UI and then create a new ticket for that user by clicking on the create ticket button.
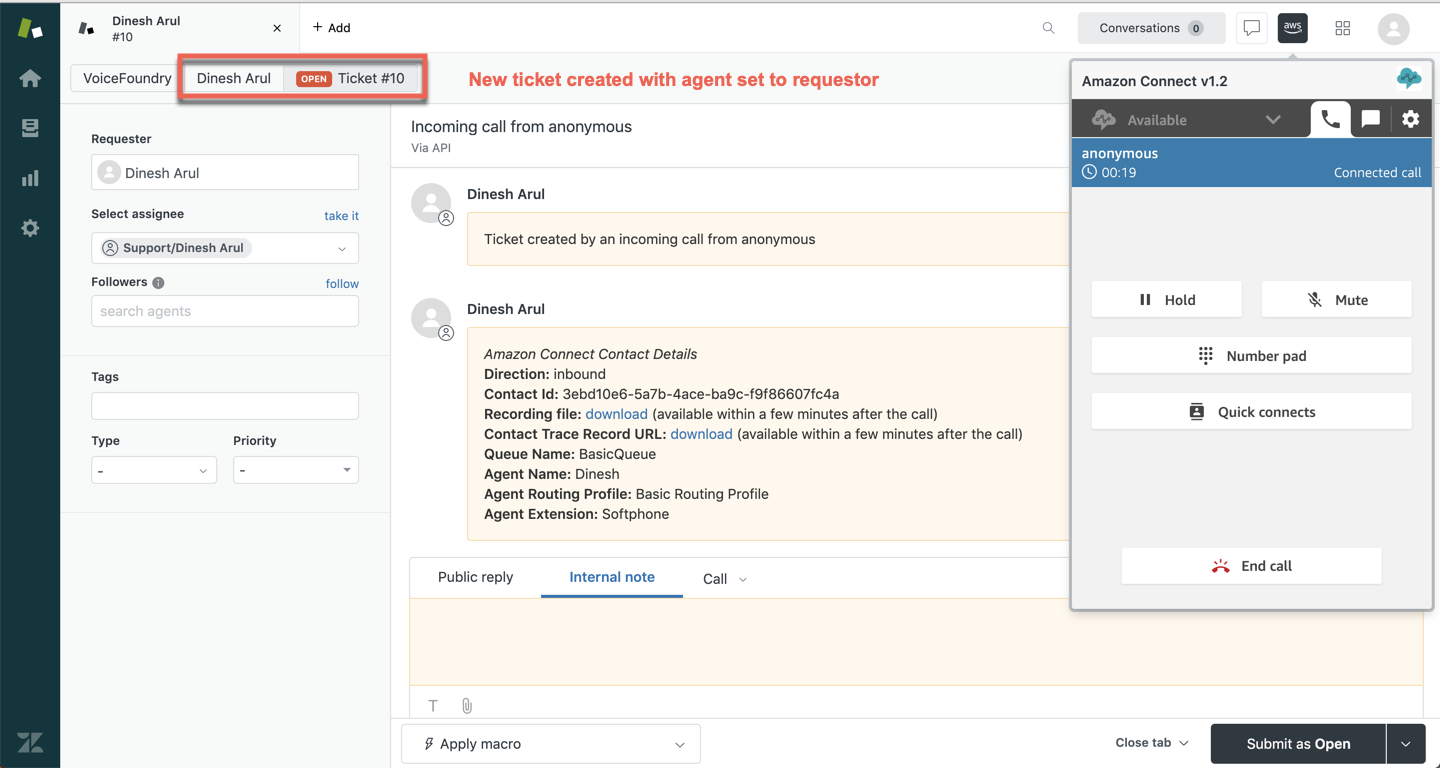
If an agent answers a call from an anonymous number and the caller has entered an invalid ticket number, no ticket or user profile is popped for the agent. The agent can click on the create ticket button to create a new user with the agent set to requestor and a new ticket attached to this user.
Alternatively, the agent can first identify the caller and if they are an existing user the agent can navigate to the existing user’s profile and click on the create ticket button to create a ticket for that user.
The agent may also establish if the call relates to one of the user’s existing tickets and attach the call to it by opening the ticket and then clicking on the attach to current button.
Recent ticket attribute
The recent_ticket_timeout attribute and create ticket after minutes app setting allows for a recent ticket of a recognised caller to pop for the agent instead of creating a new ticket. For example, if the recent_ticket_timeout attribute or create ticket after minutes app setting is set to 15, a new ticket will only be created if there hasn’t been a ticket created or updated within the last 15 minutes for that recognised caller.
The following apply if the recent_ticket_timeout attribute has been set in your contact flow, or if the create ticket after minutes app setting has been set within the app’s settings.
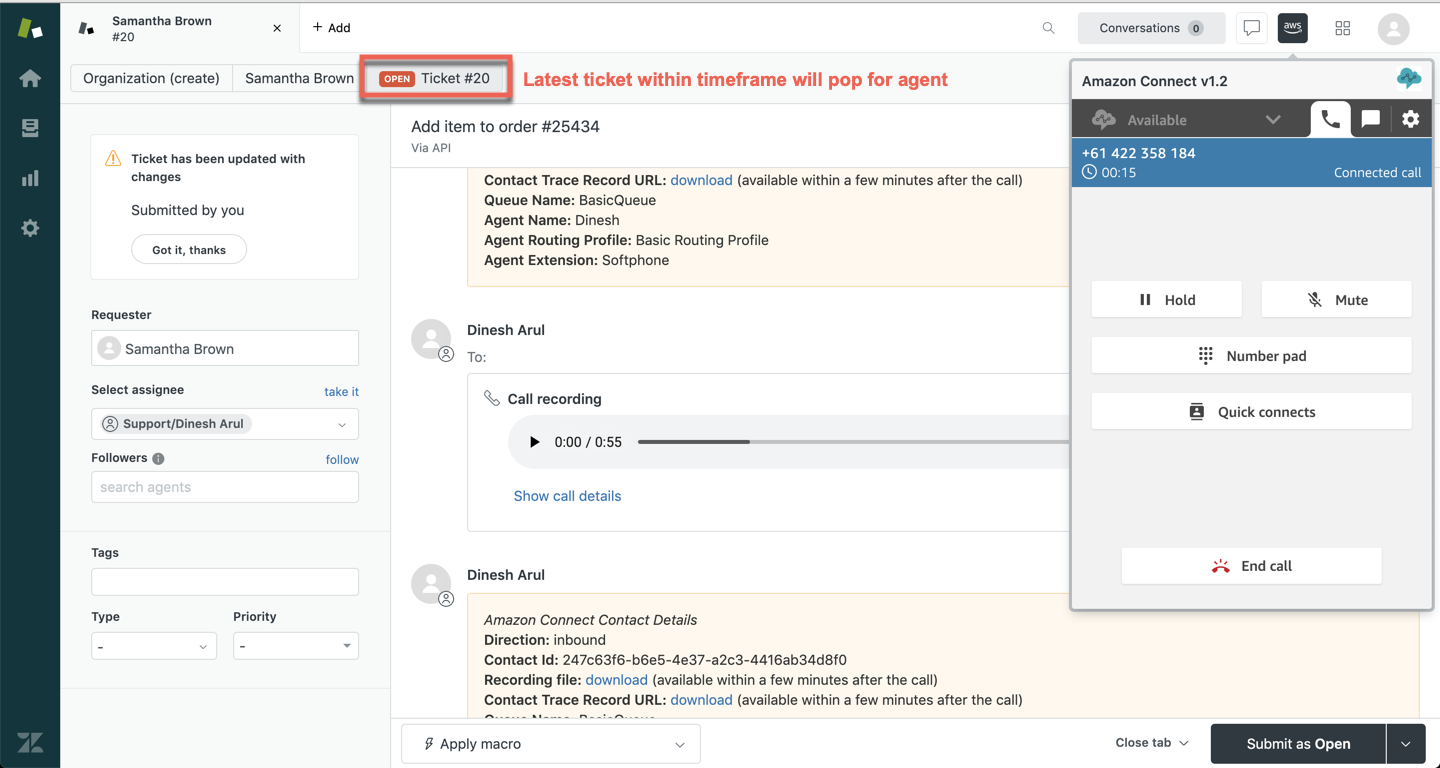
If an agent answers a call from a recognised number and the caller has a recently created or updated ticket within the specified timeframe, then that latest ticket is popped and the agent can attach the call to it by clicking on the attach to current button.
.png?inst-v=c68211a4-40ea-467f-901c-a9ab519fa700)
If the call is not related to the popped ticket, the agent can attach the call to a different ticket or create a new one by clicking on the create ticket button.
If an agent answers a call from a recognised number and the caller has a recently created or updated ticket outside of the specified timeframe, that user’s profile is popped and the agent has the option of either clicking on the create ticket button to create a ticket for that user or if the call relates to one of the user’s existing tickets the agent can open an existing ticket and then click on the attach to current button to attach the call to it.
Mandatory ticket creation
When ticket assignment mode is set to agent and the call finishes before you manage to create a ticket, or attach the call to one, there’s a contact flow attribute force_ticket_creation that governs what happens in such a situation:
if the
force_ticket_creationattribute is not set, or is set tofalsenothing happens, no ticket is created.if the
force_ticket_creationattribute is set totruea new ticket will be created with you (the agent) as the requester. You will then need to change the requester to appropriate user, and possibly merge the ticket to an existing one.
Queue notification on connecting
On an incoming contact connection event, the serving queue name will be displayed before you accept the contact. This applies to channels voice and chat for incoming contacts. For callbacks the queue name is shown at the time the callback is offered to you.
Queue name remains displayed above the Accept/Reject buttons until you either accept or reject the contact, or the contact is missed.
Note, if you have auto-accept configured in your user settings, the queue name will only be visible for a very short time, if at all.
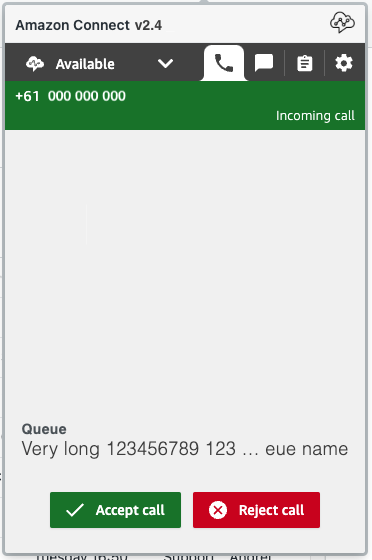
Queue name is clipped at 35 characters with ellipsis replacing the overflow, but leaving the last 8 characters visible. A tooltip on hover will show the whole name.
Setting up dual ringer
Dual ringer enables you to specify additional audio device on your workstation to ring when a new contact is being routed to you (either voice, chat or task). You can temporarily enable that, in case you need to take off your headset (primary ringer) and could thus potentially miss an incoming contact.
Setting the additional audio device is done in the sidebar column via a simple drop-down:
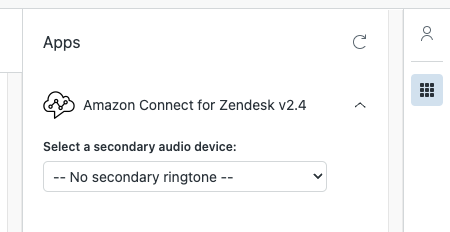
Drop-down will list all available (output) audio devices on your system:
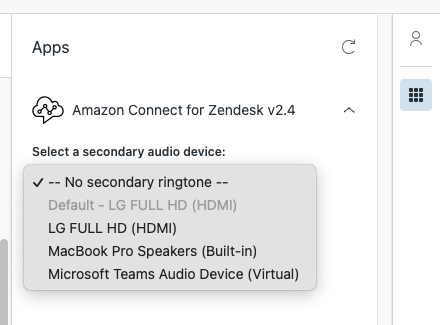
When you select a device, that device will play a short sample of the ringtone.
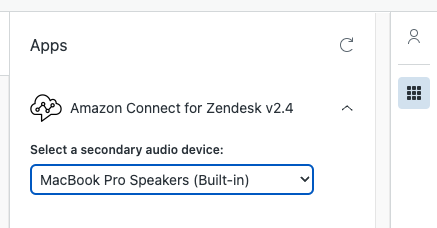
Dual ringtone with selected device will stay in effect until changed. Incoming contacts will ring on both, the default audio device (eg. headset) and the selected secondary device. When you want to stop using the secondary ringer, just revert back to the -- No secondary ringtone -- option.
Note: if you clear the cache while the secondary device is active, you will lose this setting and will need to select the secondary device again.
Outbound calls (auto assignment)
The following apply when the ticket_assignment attribute has been set to auto or force in your contact flow. If the ticket_assignment attribute has not been set within your contact flow, it will default to auto.
Note that in contrast with inbound calls, setting the assignment mode to force in an outbound contact flow is redundant, as it has no effect - the app behaves exactly the same as in the auto assignment.
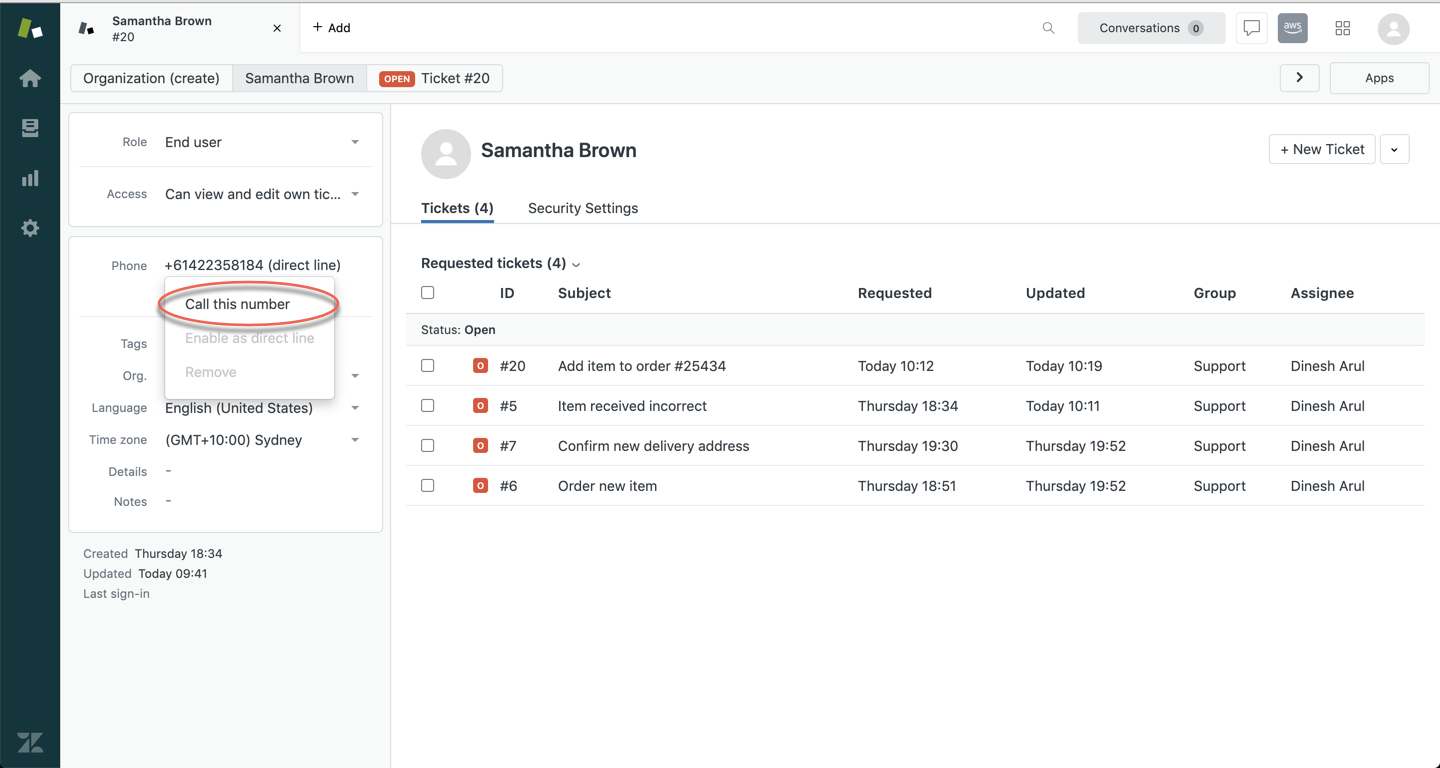
Zendesk user profile
To make an outbound call from a user profile, click on the user’s phone number and select call this number. A new ticket will automatically be created for that user.
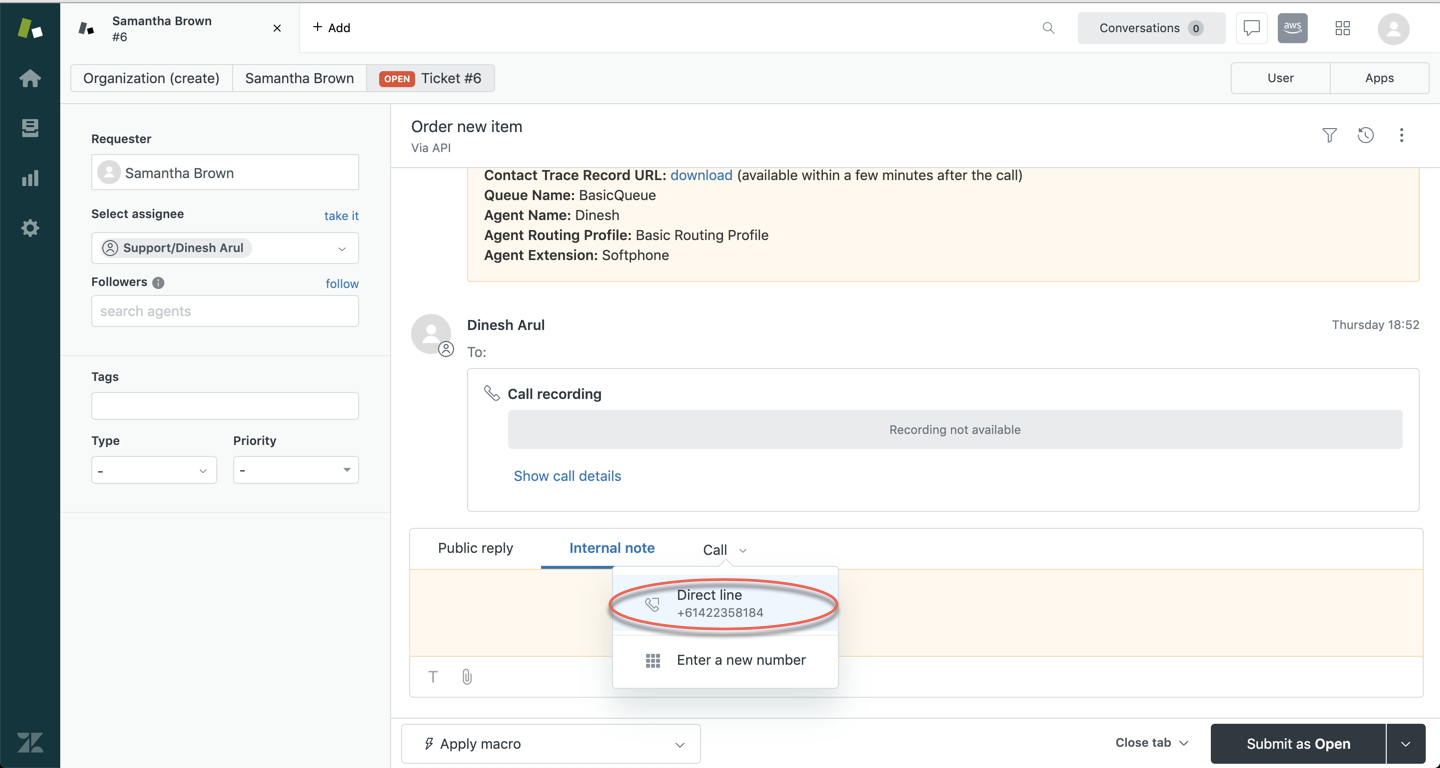
Zendesk ticket
To make an outbound call from the current ticket, click on Call and then select Direct line. The call will be attached to the ticket.
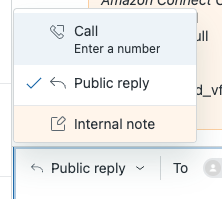
If you’re using Zendesk Agent Workspace, then click on Public reply and then select Call with the number.
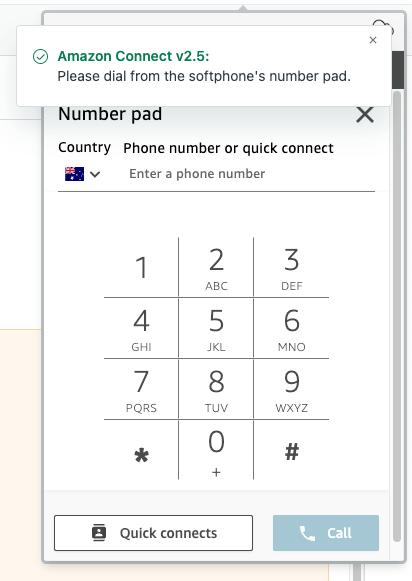
If the user doesn’t have a phone number yet then choose the option Call, Enter a number.
This will cause the softphone to popup (if not already open) with a notification to dial the number via softphone.
Once the call is connected its details will be attached to the current ticket.
Connect softphone
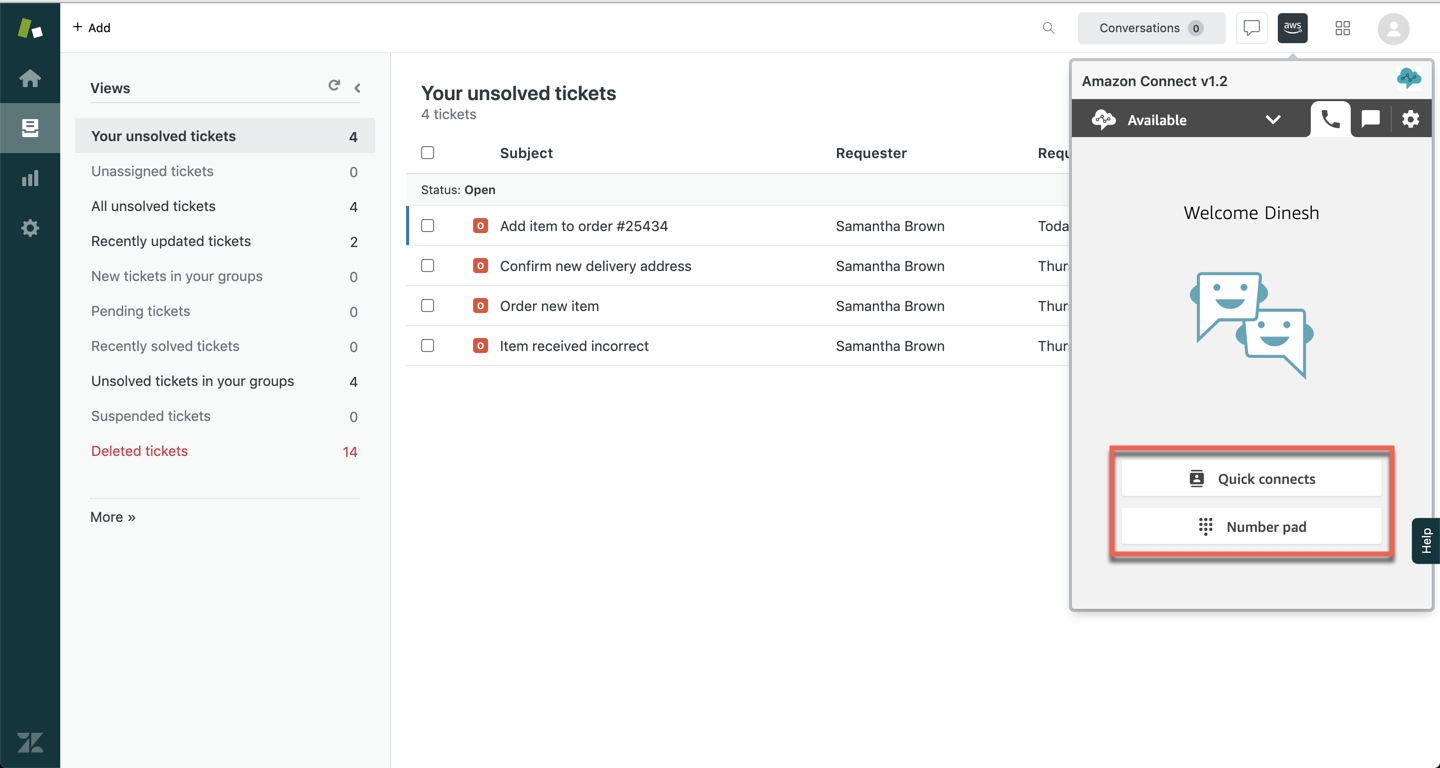
To make an outbound call from the Connect softphone, initiate the call via the dial pad or Quick Connects.
Recognised number
If the number dialled belongs to an existing Zendesk user, a new ticket will be automatically created for that user.
Unrecognised number
If the number dialled is not recognised (and not being dialled from a ticket - see above) then behaviour depends on the contact flow attribute all_outbound:
when not set or set to
false, nothing happens. The call is not attached to any new or existing ticket.when set to
true, a new user is created with this number and a ticket is automatically created for that user.
Outbound calls (manual assignment)
The following apply when the ticket_assignment attribute has been set to agent in your Amazon Connect contact flow.
Zendesk user profile
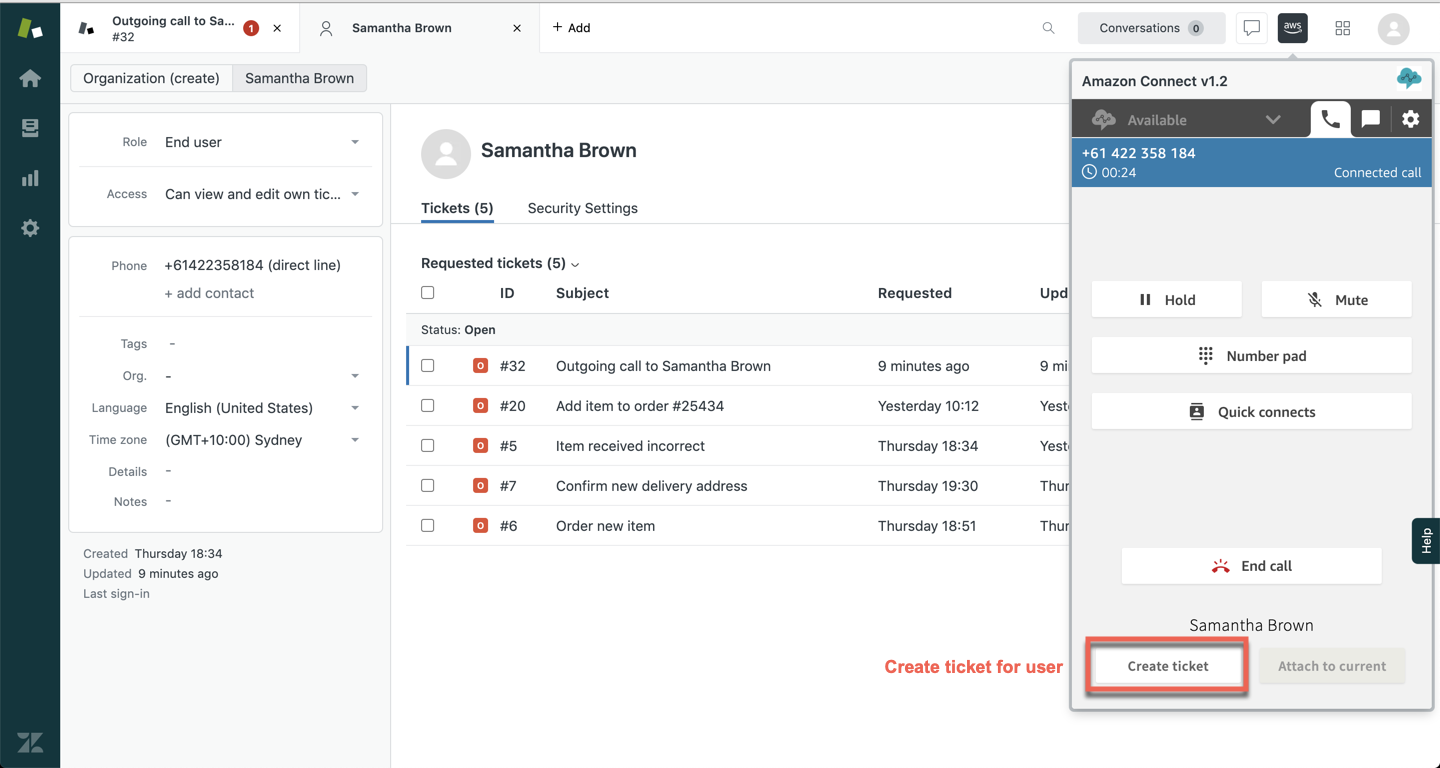
To make an outbound call from a user profile, click on the user’s phone number and select Call this number. You then have the option of either clicking on the Create ticket button to create a ticket for that user, or if the call relates to one of the user’s existing tickets you can open an existing ticket and then click on the Attach to current button to attach the call to it.
Zendesk ticket
To make an outbound call from a ticket, click on Call and then select Direct line, or if you’re using Zendesk Agent Workspace, then click on Public reply and then select Call . Behaviour is the same as making an outbound call from a ticket with assignment mode in auto (see above).
Connect softphone
To make an outbound call from the Connect softphone, initiate the call via the dial pad or Quick Connects.
Recognised number
If the number dialled is recognised as the number of an existing user, that user’s profile is popped and you have the option of either clicking on the Create ticket button to create a new ticket for that user or if the call relates to one of the user’s existing tickets you can open an existing ticket and then click on the Attach to current button to attach the call to it.
Unrecognised number
If the dialled number is not recognised you have the option of either clicking on the Create ticket button which will create a new user with the dialled number and a new ticket for this new user. If the call relates to an existing ticket though, you can open that ticket and then click on the Attach to current button to attach the call to it.
Agent to agent call transfers
The behaviours described below apply when you transfer a call to another agent or to a queue. They are influenced by the current value of the ticket_assignment contact flow attribute, which can either retain the original value, set in the first leg of the call, or have a different value set in the transfer flow that belongs to selected QuickConnect.
Automatic assignment: If the
ticket_assignmentattribute has been set toauto(or not set), when agent #1 transfers a call to agent #2, the call details for the transferred part of the is automatically attached to the existing ticket that was created or used when agent #1 accepted the call.
In the event the original ticket could not be found, due to indexing delay in Zendesk, the assignment mode would flip to agent and agent #2 will need to ask agent #1 for the appropriate ticket number, search for that ticket in Zendesk and then attach the call to it. If no ticket was created by agent #1, then agent #2 will have the option to create a new ticket.
Manual assignment: If the
ticket_assignmentattribute has been set toagent, when agent #1 transfers a call to agent #2, the existing ticket that was created or used when agent #1 accepted the call pops for the agent #2, giving them the option to attach their leg of the transfer to the same ticket, or create a new ticket for the calling user.
In the event the original ticket could not be found, due to indexing delay in Zendesk, agent #2 will need to ask agent #1 for the appropriate ticket number, search for that ticket in Zendesk and then either attach the call to it or create a new ticket. If no ticket was created by agent #1, then agent #2 will have the option to create a new ticket.
Forced assignment: If the
ticket_assignmentattribute has been set toforce, when agent #1 transfers a call to agent #2, the ticket that was created or used by agent #1 is ignored and a new ticket is created for the calling user. To ensure the correct user, thecustomer_numberattribute must also be set in this case in the transfer flow: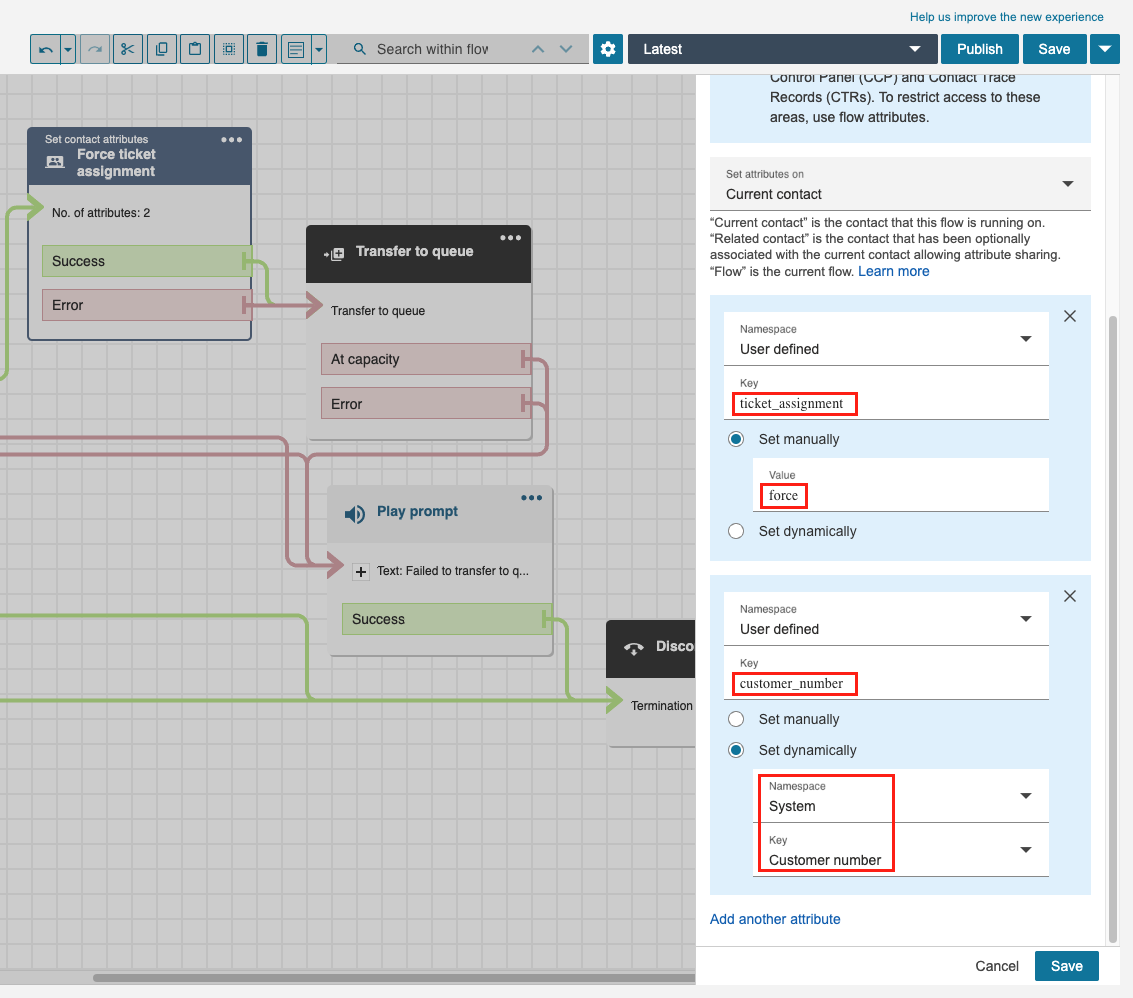
Inbound chats (auto assignment)
The following apply when the ticket_assignment attribute has been set to auto in your contact flow. If the ticket_assignment attribute has not been set within your contact flow, it will default to auto.
Recognised customer
A customer can be identified via their email address, phone number or their full name. This data may come either via chat widget or via Lex bot (sample flow available).
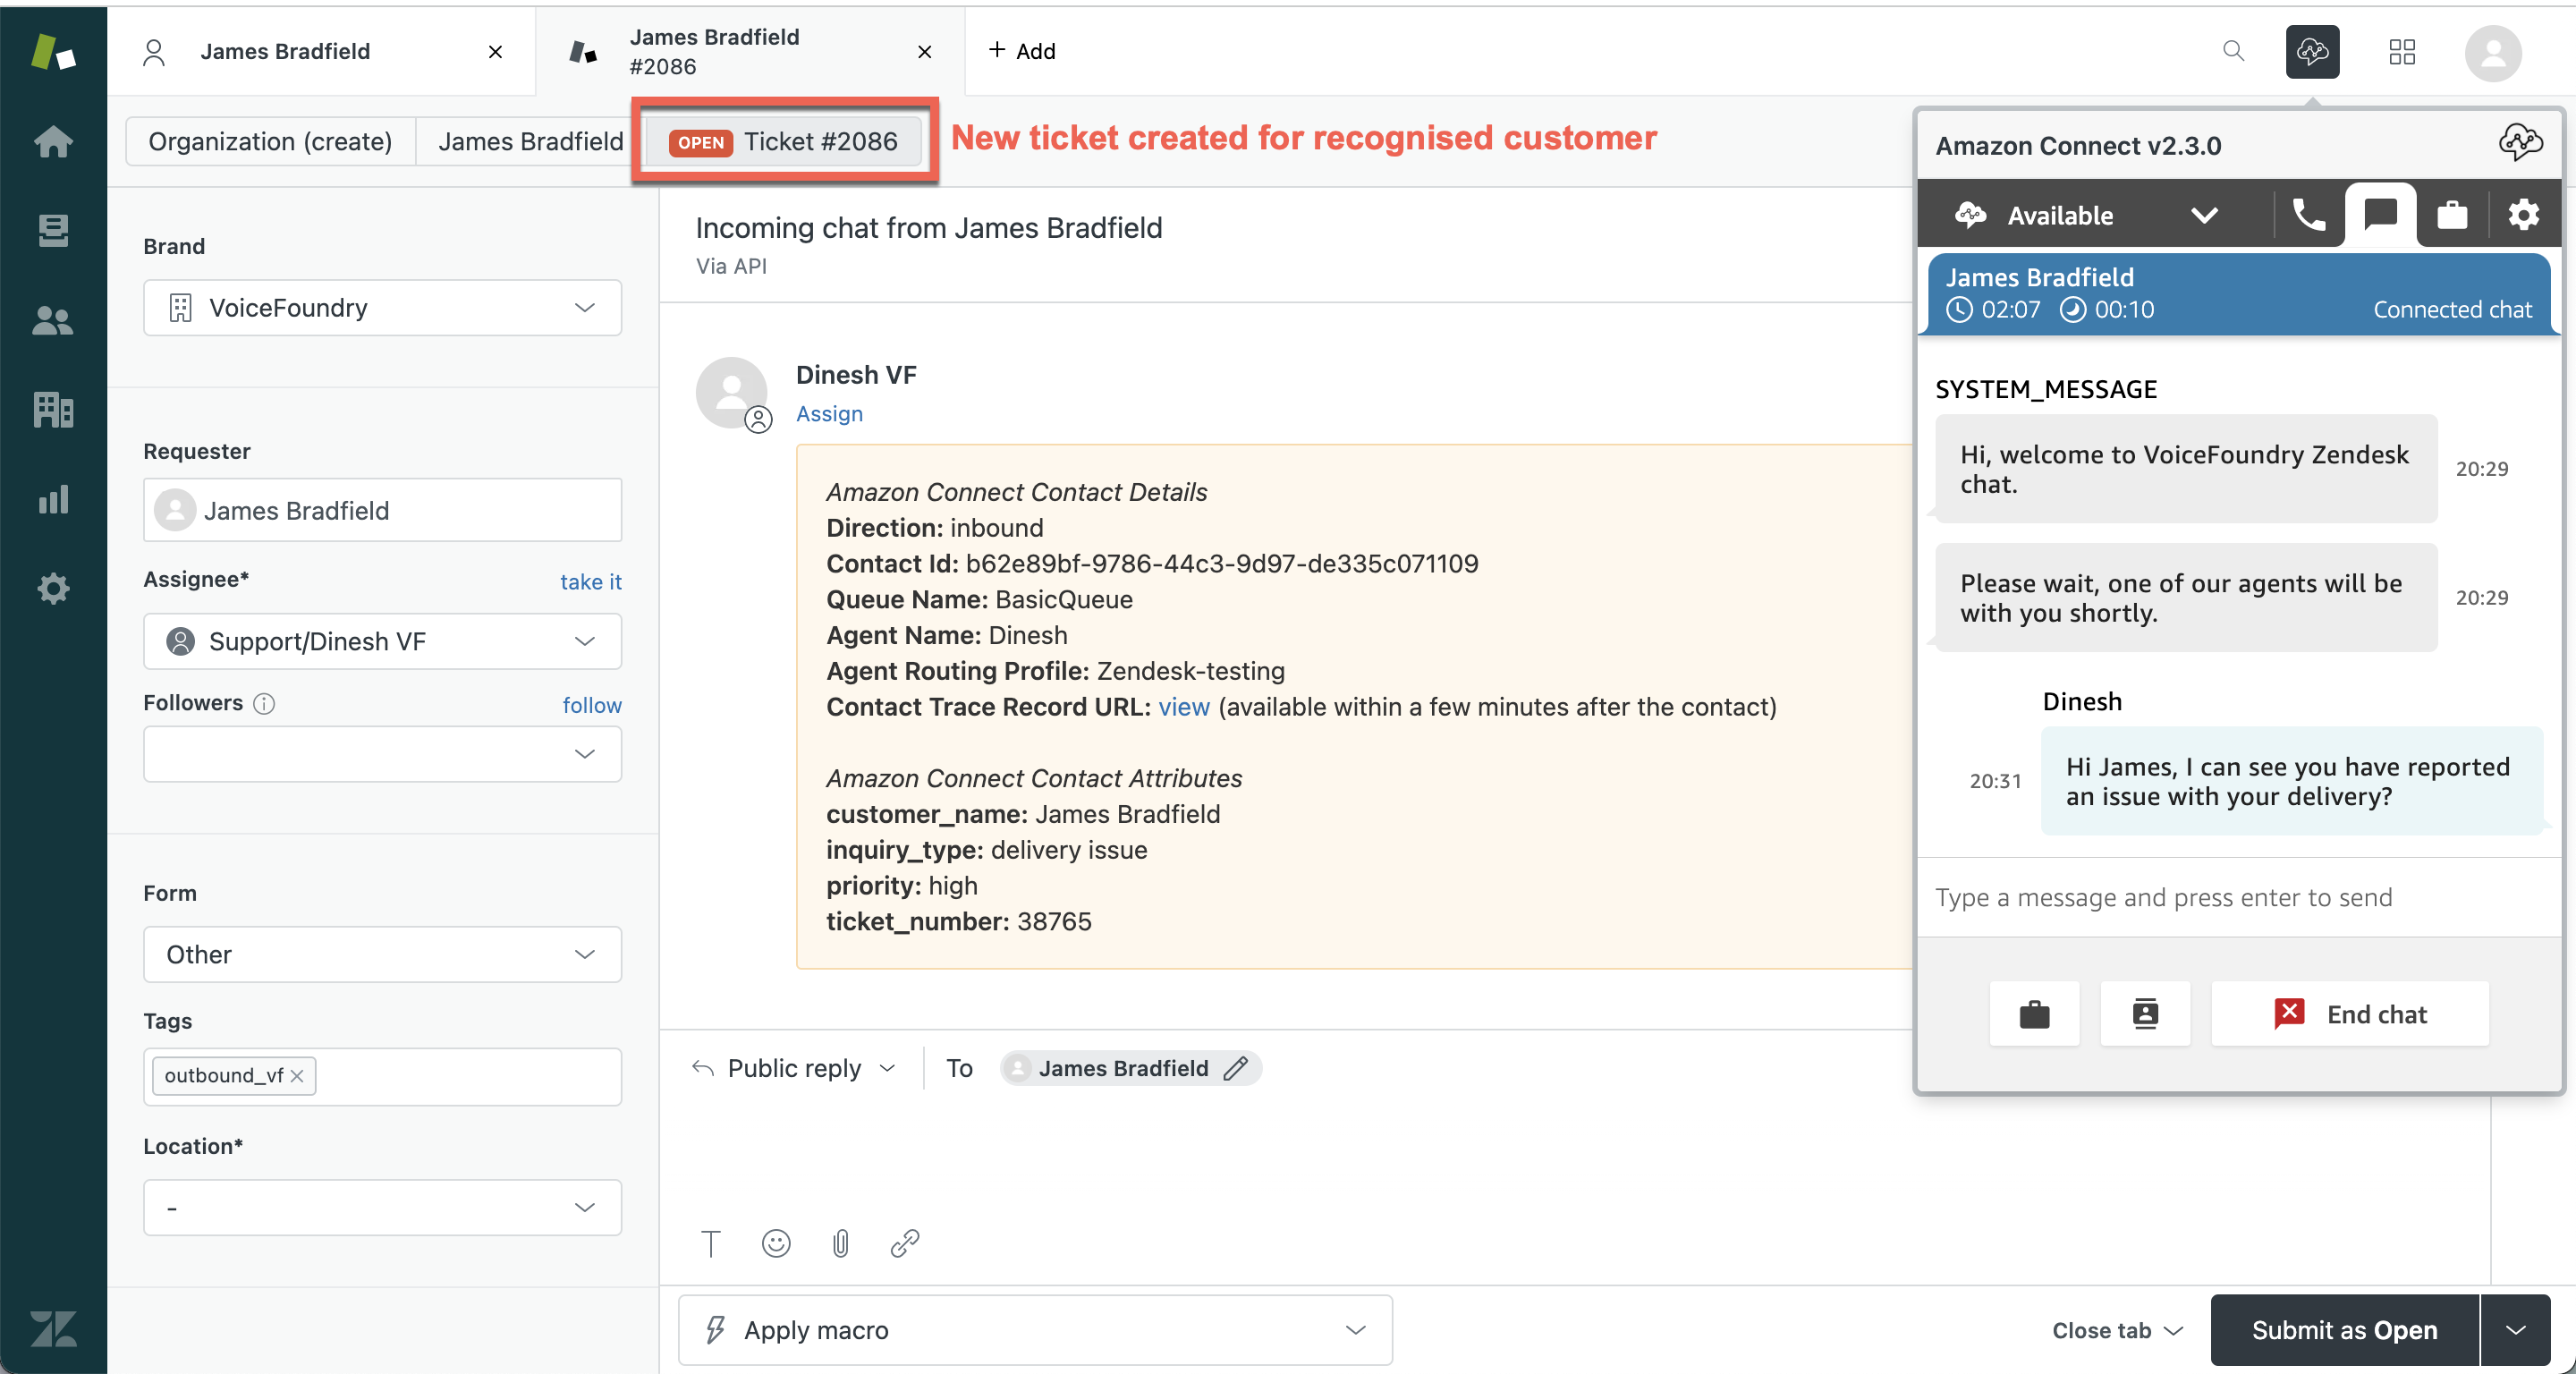
If you accept a chat from a recognised customer, a new ticket is automatically created for this user.
If later turns out that the chat is related to an existing ticket, you can merge the newly created ticket into the existing one.
The zendesk_ticket attribute allows a customer to enter a ticket number during the initial chat with a bot, and have that ticket pop for you when you answer the chat. If the customer has entered an invalid ticket, a closed ticket or the one that belongs to someone else, the app will switch the assignment mode from auto to agent. This will pop the recognised customer and allow you to create a ticket or attach the call to existing one. If the ticket_assignment attribute was set to force though, then a new ticket is automatically created for the recognised customer.
New customer
If a customer provides one of the identifiable data types (email, phone, name) via chat widget or a bot conversation, and they can’t be identified as an existing Zendesk user, then a new Zendesk user will be automatically created with the profile containing the data they’ve provided. In such case a new ticket will be created automatically.
If the customer has provided their full name which incidentally matches multiple existing Zendesk users then the assignment mode will switch to agent, similar to the unrecognised customer scenario described below.
Unrecognised customer
If an agent accepts a chat from an unrecognised customer who hasn’t provided any identifiable info, the app will switch the ticket assignment mode from auto to agent and the agent can create a new Zendesk user and then click on the create ticket button to create a new ticket attached to this user.
Alternatively, the agent can first identify the customer and if they are an existing user the agent can navigate to the existing user’s profile and click on the create ticket button to create a ticket for that user.
The agent may also establish if the chat relates to one of the user’s existing tickets and attach the chat to it by opening the ticket and then clicking on the attach to current button.
Note: if ticket_assignment attribute has been set to force in your chat contact flow, then a new ticket will be automatically created with you (the agent) as a requester. You'll need to manually update the requester in that case, and/or merge the ticket to an existing one.
Inbound chats (manual assignment)
The following apply when the ticket_assignment attribute has been set to agent in your contact flow.
Recognised customer
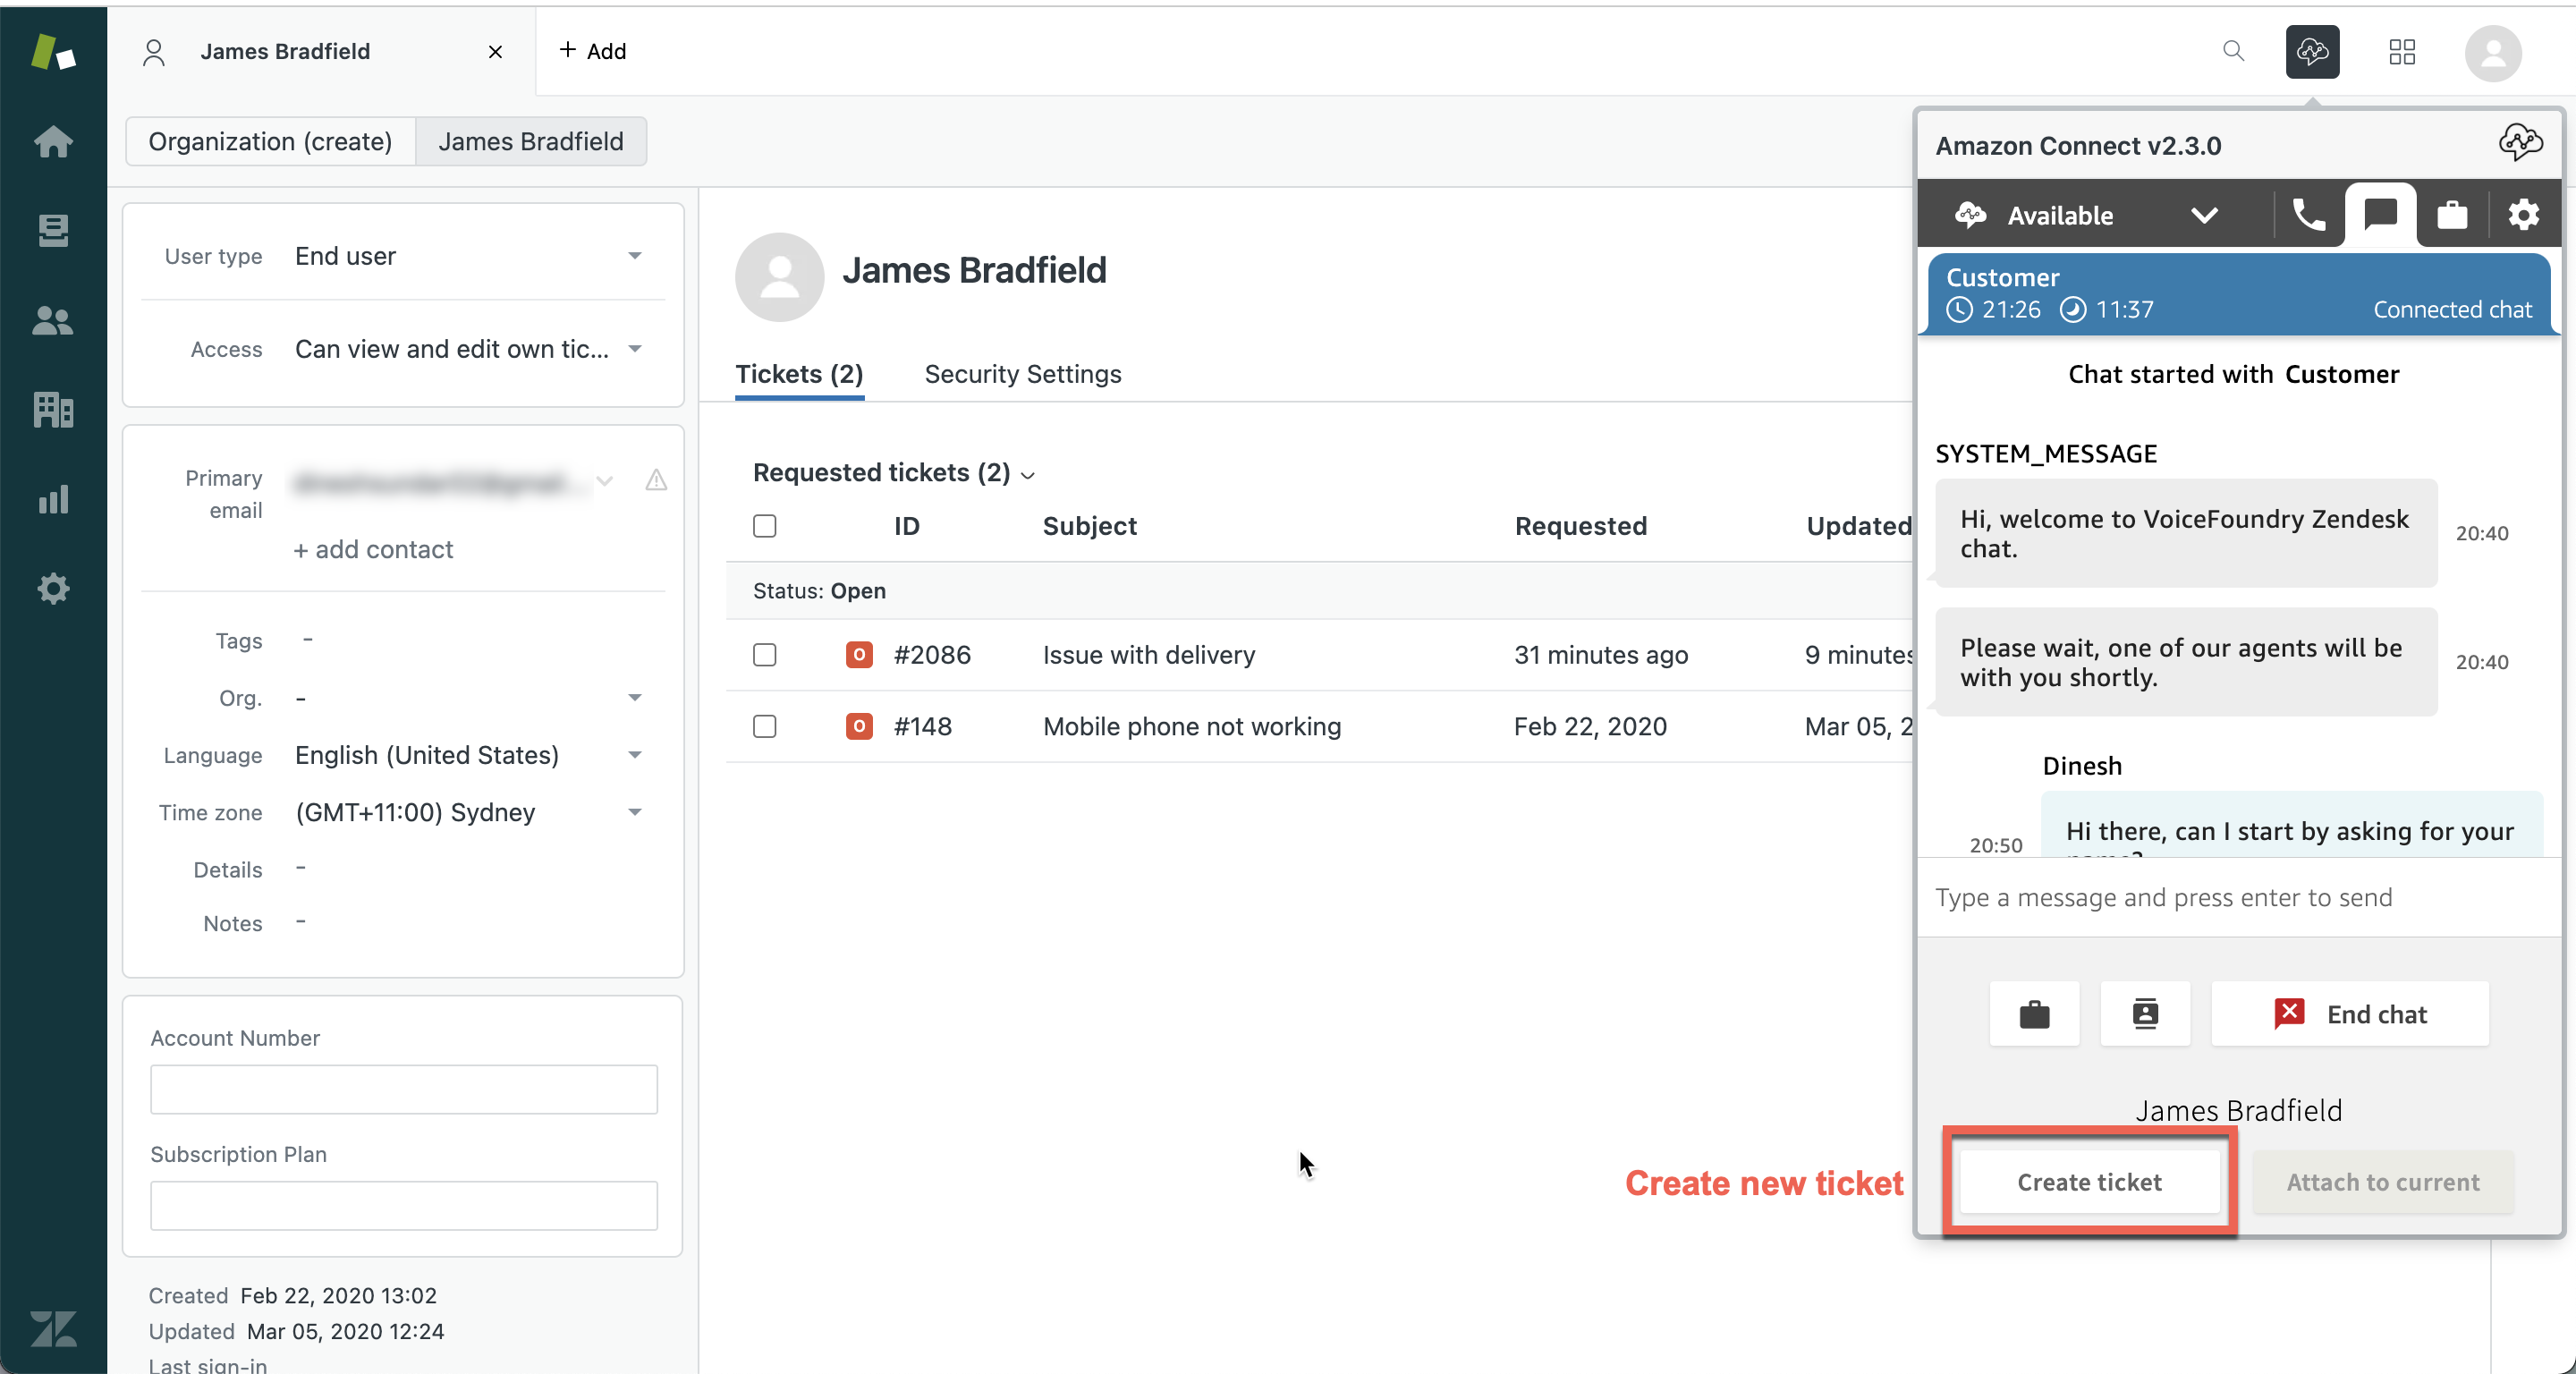
If an agent answers a chat from a recognised customer, that user’s profile is popped and the agent has the option of either clicking on the create ticket button to create a ticket for that user or if the chat relates to one of the user’s existing tickets the agent can open an existing ticket and then click on the attach to current button to attach the chat to it.
Unrecognised customer
If an agent accepts a chat from an unrecognised customer, the agent can create a new user and then click on the create ticket button to create a new ticket attached to this user.
Alternatively, the agent can first identify the customer and if they are an existing user the agent can navigate to the existing user’s profile and click on the create ticket button to create a ticket for that user.
The agent may also establish if the chat relates to one of the user’s existing tickets and attach the chat to it by opening the ticket and then clicking on the attach to current button.
Auto attaching chat continuation to an existing ticket
Amazon Connect chat has ability to continue a previous chat conversation if one was ended by an agent but the customer wants it to continue and sends another message (within a certain time frame). This is reflected in the app behaviour in two ways: firstly, the continued chat is automatically attached to the ticket that contained the original conversation and secondly, the attached transcript always contains the whole conversation.
Agent to agent chat transfers
Chats can be transferred in the same way as calls, except that the process is asynchronous. When a chat is successfully transferred to an agent or a queue (note that the agent doesn’t need to be available), the chat will be attached to the same ticket and the transcript will contain the whole conversation.
In the event of an error (e.g. indexing delay in Zendesk) the ticket assignment mode will change from auto to agent so that the transferred-to agent can search for the customer and/or ticket. As good practice it is recommended to have the first agent mention the ticket number in the chat, before transferring.
Tasks assignments
You can assign tasks originating from Amazon Connect to new or existing Zendesk support tickets. There are two use case scenarios which determine your user experience when dealing with Connect tasks:
An incoming Connect tasks is already linked to an existing tickets, by having the task
namefield in the format ofZendesk-nnnnwhere nnnn stands for Zendesk ticket number. Upon receiving such task in the Contact Control Panel (CCP), the linked Zendesk ticket will automatically “pop” and after you accept the task the relevant Connect task details will be appended to the ticket as an internal note. (This scenario will most commonly arise when your administrator has established Zendesk → Amazon EventBridge integration and configured associated task creation rules.)You have received an unrelated Connect task in CCP (with arbitrary value in the
namefield, not in the above format). In this case the ticket assignment mode will automatically change toagent(manual assignment) so you will be able to select a user or a ticket to either create a new ticket or attach task details to an existing ticket, similarly to calls or chats. With tasks (and unlike calls or chats) you also have an option to not assign the task to any ticket when, for example the task is of an administrative or other nature, not related to any specific case or user.
Note: if the task’s name field is in proper Zendesk ticket format as per scenario 1. above, but a corresponding ticket number doesn’t exist, it will be treated as unrelated task, per scenario 2.
Integration via EventBridge
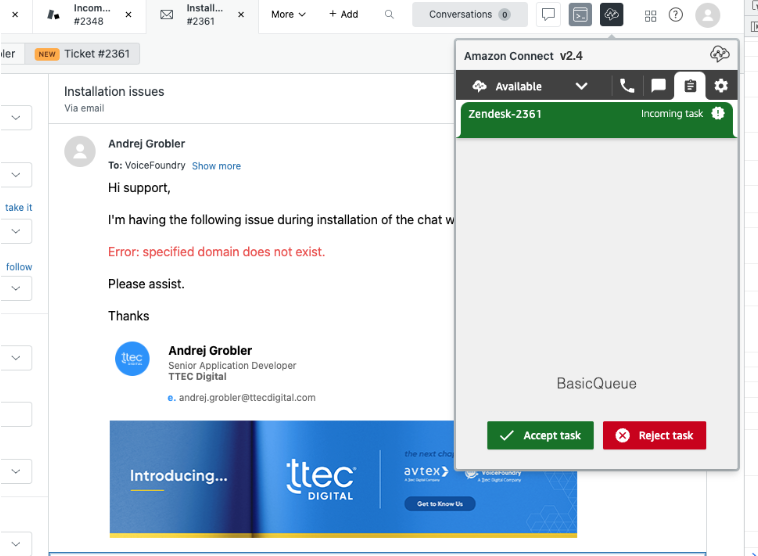
Zendesk and Amazon Web Services support integration between platforms via Amazon EventBridge, where a Zendesk event, such as Support ticket creation, can be captured and processed in EventBridge. An example integration is automatic Amazon Connect task creation on such event. Tasks that are created via such integration follow the naming convention as per scenario 1. above.
If such task is routed to you, the connector app will automatically pop the related Zendesk ticket:
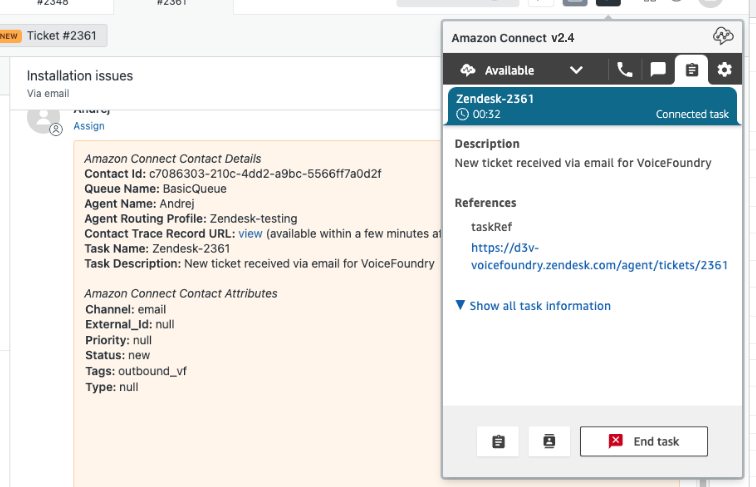
If you accept the task, it’s details will be added as a private note to that ticket, same as they would for accepted call:
Using the app in media-less mode
If media-less mode has been enabled in your app’s settings, follow the below instructions to correctly sign in to your Zendesk instance.
Open a tab in your browser and sign in to your Contact Control Panel (CCP).
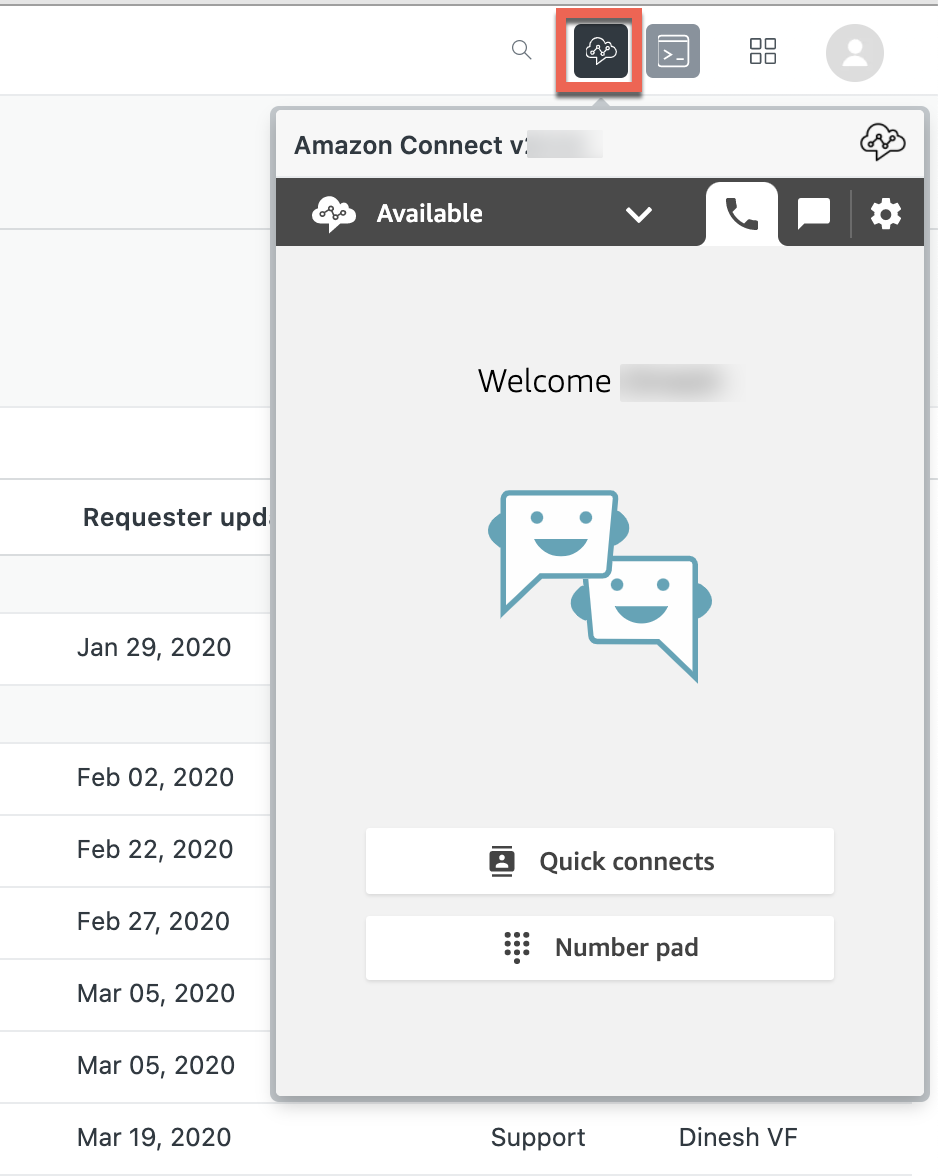
If the CCP does not automatically load for you and you are instead presented with the Connect console, click on the phone icon.

Make sure you allow the use of your microphone.
Open a new tab in your browser and sign in to your Zendesk instance.
Click on the Connect app icon in the top right corner and you should see that you are already logged in. You are now set to receive inbound calls and make outbound calls. You do not need to use the CCP that is open in another tab, however you will need to keep this tab open whilst you are using the Connect app in Zendesk.
In the event you are unable to accept incoming calls or make outbound calls, clear your browser cache, then follow the above steps again.
Handling multiple concurrent contacts
You may have your routing profile configured to handle multiple chats and/or multiple tasks at the same time. Additionally, there’s an Amazon Connect feature where an agent can handle contacts across multiple channels (talk, chat, task) at the same time, if this is enabled in their routing profile.
Most of the cross-channel and multiple contacts functionality is driven via the built-in Contact Control Panel (CCP), with a couple of new behaviours in the Zendesk Support UI:
When you are on a contact (chat or task) and a new contact comes in (call, chat or task), the behaviour will be the same as for any new contact, i.e. a corresponding user (if any) will pop, and when you accept the contact a new ticket will be created for that contact and will pop. The ticket of the first contact will still be active and available in its separate ticket tab.
Note that if you are on a call, new chat or task contacts won’t be routed to you.When you open a ticket tab which has a corresponding active contact, the CCP will automatically switch to that contact (across all channels)
When you use tabs in CCP to switch between the active contacts, corresponding tickets will be automatically brought to front (pop)
If a chat contact is idle (no response from a customer for a while) and you minimise the app (hiding CCP), the app will pop open if any of the open chats receives a new message. A notification badge within the respective conversation tab in CCP UI will indicate which conversation received a message, so that you can switch to it.
When one of the active contacts ends, the corresponding ticket will be automatically updated, as per current functionality and brought to front (pop). At the same time the CCP will automatically switch to that contact (in its After Call Work state). When you close that contact the CCP will display another open contact and the corresponding ticket will automatically pop. Please note that this is true only when there are still open contacts within that same channel. For example if you have a call open and also a chat, upon closing the call contact the CCP won’t automatically switch to the remaining chat. (You can still switch to it manually though.)
At the moment the CCP popup window automatically hides when a voice contact is connected, as to not obscure the underlying Zendesk UI unnecessarily. This behaviour changes slightly with multiple concurrent contacts - the CCP remains visible when there are two or more active contacts.
Using multiple browser tabs
You can have the Zendesk Support app open in multiple tabs/windows simultaneously. The Amazon Connect app for Zendesk will gracefully handle contact events across those tabs and/or windows. Only the window/tab that first received (or initiated) the call will be processing it (contact processing tab). All others will ignore any further events related to that call. This ensures tickets are not duplicated or otherwise affected by multiple instances of the app processing the same call. If the contact processing tab is duplicated it’s treated as a new tab and the call will continue to be processed in the original one.
Note that handling multiple concurrent contacts is not supported across multiple browser tabs (and/or windows). This means you can’t have several concurrent contacts open, each in its separate browser tab.
You can still open multiple browser tabs with your Zendesk Support app and accept contacts in different browser tabs, as long as they’re processed one at a time. If however, a second contact comes in while the first is still open, it will be handled in the browser tab where the first contact was accepted (or dialled out from). It’s important not to close this tab or its window. If this happens by accident, try to reopen it (eg. CTRL+SHIFT+T / CTRL+SHIFT+N in Chrome). Multiple concurrent contact navigation features described above will only work in this contact processing tab.
Unless there are compelling business reasons, we strongly recommend using just a single browser tab/window and navigate contacts and tickets within CCP and Zendesk UI respectively.
Amazon Connect VoiceID
Amazon Connect Voice ID, a feature of Amazon Connect, uses machine learning to provide real-time caller authentication and fraud risk detection to make voice interactions faster and more secure. You read more about it here.
Amazon Connect app for Zendesk adds some additional enhancements which improve both customer and your experience as an agent.
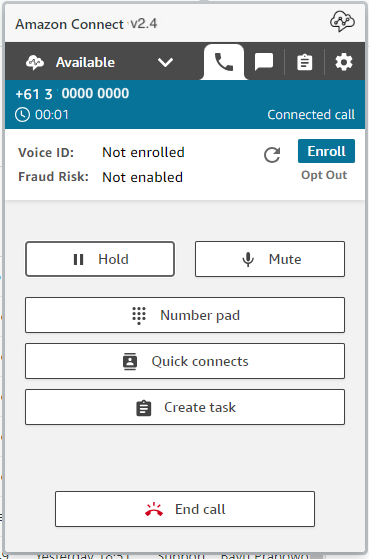
A customer calls for the first time, or is not recognised, or is an existing customer but not yet enrolled or opted out (their status is blank). A unique id is setup as their VoiceID identifier.
The call is placed into a queue and routed to you. When you accept the call the VoiceID UI is displayed, where you can see that the customer is not yet enrolled. You can then suggest to the customer to enrol into VoiceID. If the customer agrees you can enrol them by clicking the Enrol button. If they decline you mark them as opted out by clicking the Opt out button.
At the end of the call, the app checks customer’s enrolment status and saves it into their voice authentication status Zendesk user field. It also saves the designated voice authentication id into respective Zendesk user field. Note: you’ll be able to see these fields in the user pane, but please make sure not to edit or clear them, as this would corrupt the customer’s VoiceID and they would need to go through the enrolment (or opt out) process again.
Later, when that same customer calls again and are identified by the Zendesk-Search add-on, the contact flow looks into their enrolment status and takes one of the two paths:
If the enrolment status is ENROLLED, the IVR asks the customer to speak for about 10 seconds, so that they can be verified by their voiceprint. VoiceID verifies them against the stored authentication id, retrieved from the respective Zendesk user field. If they are successfully authenticated, you will see that immediately upon being connected. If they are not authenticated though or authentication result is inconclusive, the
ticket_assignmentcontact attribute will be set toagent(manual), so that the call and the related Zendesk support ticket is not automatically attributed to a potentially wrong customer. You will need to perform a standard full identity verification in that case.When the enrolment status is OPTED_OUT, the IVR will skip voice verification and you will be able to see that customer is not opted into the VoiceID. In this case you will again, need to perform a standard full identity verification.
Regardless of the current enrolment status, a customer can always request a change. So they can decide to opt out after being already enrolled, or the opposite - request to be enrolled after they’ve opted out. The app will store their last updated status in the respective Zendesk user field.